Intro to ArPython Modules & Packages
Intro to ArPython Modules & PackagesIntroductionLearning objectives:Resources: 1. A simple example: The math module» Exercise 1: Importing and using the math module2. Python's Standard modules» Exercise 2: Python's standard modules3. Some particularly useful modules: os and sys» Exercise 3a: The os module:osModuleDemo.py » Exercise 3b: Using the sys module to accept arguments: sysModuleDemo.py 4. More on importing modules - and the "namespace" concept» Exercise 4 - Alternative import statements5. Introduction to the ArcPy module» Exercise 5 - A quick introduction to ArcPySummary
Introduction
The previous section introduced us to the basics of Python: objects (number, strings, etc.), some scripting techniques (looping and conditional processing), and the general anatomy of a Python script (comments, variables, and a sequence of python statements). While there's a great deal you can do with these basic elements of Python, we've really only scratched the surface.
In this tutorial we look beyond Python's set of built-in functions and into the world of Python modules and packages.
In its simplest form, a Python module (also sometimes called a "library") is simply a Python script or set of scripts that us used within another Python script, similar to how a geoprocessing model in ArcGIS can contain other geoprocessing models. A number of useful modules are distributed with basic Python, and heaps more developed by the greater Python community can be imported into your Python scripting environment. In the exercises below, we examine some common Python modules in preparation for using the ArcPy module, which serves as the gateway for using ArcGIS within Python.
A Python package refers to a collection of modules or sometimes just to a more complex module. Behind the scenes, packages are organized a bit differently than modules, formally speaking. From a user's perspective, however, they behave functionally the same. Indeed, the two names are often used interchangeably, as I will do here in this document.
Learning objectives:
- Review a simple example of importing and using a module
- Examine what modules are included with a "base" Python installation.
- Exploring some especially useful modules: the
osandsysmodule. - The concept of "namespace" when importing a module.
- An introduction to the
ArcPypackage.
Resources:
- To run the exercises will included in this session, download ArcPy1_Modules.zip file to a local folder and unpack it.
- Python documentation on modules: https://docs.python.org/3.6/tutorial/modules.html
- Python module index: https://docs.python.org/3.6/py-modindex.html
- ESRI documentation on the ArcPy module: http://pro.arcgis.com/en/pro-app/arcpy/get-started/what-is-arcpy-.htm
1. A simple example: The math module
Let's begin by revisiting how Python can be used as a calculator. Fire up PythonWin's interactive prompt or open up a Jupyter notebook for the following exercises.
At a Python prompt, type the following:
15 * 528 ** 2Open up the
Python works nicely to compute our output. But try to do anything beyond basic math, a calculating the logarithm of a number for example, and you may encounters errors:
Attempt the following in Python:
21log(10)2cos(3.14159)
We get errors (and it's not just because of the syntax). Turns out that Python itself is not able to compute logarithms, trigonometry, square roots, and other slightly more sophisticated mathematical functions. Surely, Python should be able to do that, but how?
The solution is to augment Python's built-in functionality by importing a module. Here, we examine a simple example of a module in action - the math module which brings, as you might guess, additional mathematical functionality to Python.
» Exercise 1: Importing and using the math module
In the PythonWin interactive window, type the following to import the math module
11import mathThis statement imports all the functionality of the math module to your current PythonWin session. Or if this statement were included in a script, it would add the math functionality to your script.
To see a list of all the functions associated with the math module type:
11dir(math)You may also see a list of the functions in the dropdown menu that appears after typing math. in the interactive window...
To get help and the syntax of a specific math function type the following (here for the sqrt function):
11help(math.log)Or better yet, you can read the comprehensive module documentation on-line:
https://docs.python.org/3.6/library/math.htmlGreat! Now we have a function that can calculate square roots. Let's try it:
11log(10)OK not quite, but we were close. In order to run functions associated with the math module, we need explicitly call that the function is part of the math module, done by preceding the function with the name of the module:
21math.log(10)2math.cos(3.14159)
2. Python's Standard modules
Python is distributed as a core program which includes the scripting language and its built-in functions (the part that is overseen by Guido van Rossum, the "Benevolent Dictator for Life") as well as a suite of "standard" modules that work with the core scripting language. The list of modules included with Python is quite extensive and can be seen in by clicking on the Global Module Index link at the main documentation site for the version of Python with which you are working:
Or, you can run the following command in PythonWin (this can take a few moments to complete):
11help('modules')You'll see that there are a great many modules at your disposal! And on top of all these, there are countless modules beyond these that are available that are available to download. In fact PythonWin is itself a Python module!
We certainly won't attempt to learn all these modules, nor will you likely use all or even many of these modules. Instead, we'll focus a bit more on how incorporate modules in your scripts, and then we will examine a few particularly useful modules, including the ArcPy module that enables us to control ArcGIS from Python.
» Exercise 2: Python's standard modules
One of my favorite sites listing useful Python modules and learning about them is Doug Hellman's Python Module of the Week: https://pymotw.com/3/. I find this much more helpful than Python's own documentation.
Have a look at Mr. Hellman's description of the
mathmodule: https://pymotw.com/3/math/index.html- Use the
mathmodule to printpi. - Using the
formatcommand, can you print pi to exactly 10 decimal places?
- Use the
Next, look at the
statisticsmodule (https://pymotw.com/3/statistics/index.html)- Import the
statisticsmodule into your Python session - Compute the mean of the following list of numbers:
[10,12,14,21,29,8,11,1,30]
- Import the
Finally, have a quick look at the
datetimemodule (https://pymotw.com/3/datetime/index.html)theDate = datetime.date.today()returns what type of variable?- What are some operations you can do on this
theDatevariable? - Can you figure out how to print the current year from this
theDatevariable?
3. Some particularly useful modules: os and sys
The sys and os modules are two built-in Python modules that allow Python to interact with the machine on which it is running and its file system. These modules can be handy for, among other things, enabling your script to interact with things outside your script (e.g. script inputs and outputs), as well as navigate the folders and drives of your machine to nab a particular file or list its contents - something we'll see later that is essential in using ArcPy.
Help on these modules can be found in the Python Global Module Index and in the tutorial sections of the on-line Python documentation:
os module:
- https://docs.python.org/3/tutorial/stdlib.html#operating-system-interface
- https://docs.python.org/3/library/os.html#module-os
- https://pymotw.com/3/os.path/index.html
sys module:
» Exercise 3a: The os module:osModuleDemo.py
Open the osModuleDemo.py in Pythonwin - or simply type the commands below at a PythonWin command prompt or in a Jupyter notebook.
- First, import the
osmodule:
11import os- List the contents of your V: drive (returns a list object):
11print (os.listdir("V:\\"))- Get the current working directory (place from where PythonWin was started):
11print (os.getcwd())- Create a new folder in your V: drive:
11os.mkdir("V:\\osplayground")- Ensure that the folder you created exists:
11os.path.exists("V:\\osplayground")- Set the current working directory to the new folder, then create a file, write text, and close it.:
41os.chdir("V:\\osplayground")2fileObj = open("myFile.txt",'w')3fileObj.write("Hi!")4fileObj.close()- Open the file in a text editor to witness your handy work...:
11os.system("notepad myFile.txt")(Close the notepad application that appears before proceeding)
- Rename the file:
11os.rename("myFile.txt", "theFile.txt")- Create a pathString variable and explore various uses of the os.path sub-module:
31pathString = "V:\\osplayground\\theFile.txt" #Make a variable of the path to avoid retyping it2print (os.path.basename(pathString)) #Gets the file name (without the path)3print (os.path.dirname(pathString)) #Gets the path in which the file exists- Use the os.path.join function to create a string from path components:
21pathString2 = os.path.join(pathItems[0],"MyOtherFile.txt")2print(pathString2)- Delete the [renamed] text file you just created:
11os.remove("V:\\osplayground\\theFile.txt")- Go back to the V: drive and then delete the folder you created (if it's not in use):
21os.chdir("V:\\")2os.rmdir("V:\\osplayground\\")
From these examples of some os and os.path commands, you get a feel for the module's ability to navigate and manipulate - even open - various file-system related objects. This can be quite handy when we get into manipulating spatial datasets within Python as the input to many ArcGIS tools are path names and file names of files on the computer.
While the sys module is capable of many tasks, its primary use as far as we will be concerned is accepting user inputs from outside of python. This is essential for calling Python scripts from other applications (e.g. from ArcGIS), if we want our scripts to accept variable inputs and/or generate outputs. The sys module also allows us to stop a script in its tracks, in cases when that's appropriate.
» Exercise 3b: Using the sys module to accept arguments: sysModuleDemo.py
- Open the
3b_sysModuleDemo.pyscript (located in the ArcPy1 folder) in PythonWin. - Run the model, but in the Run Script window, enter the following in the Arguments line:

Examine what's written to the interactive window. Do you understand what's going on with respect to what's supplied in the above Run Script window and the script?
Double click the Command Prompt shortcut included in your
ArcPy1_modulesfolder. (This opens a DOS command prompt and sets the working directory to be the same as yoursysModuleDemo.pyscript.)At the dos prompt, type:
3b_sysModuleDemo.py Alfred 2000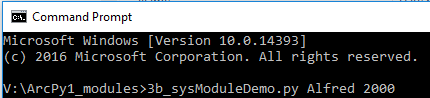
The last two steps run the Python script from outside of PythonWin. This is to demonstrate how the values can be passed seamlessly into a Python script and run.
The sys.argv object is called the argument vector, and it contains a list of objects that can get passed into a script when the script is run. This will also be quite useful as we get into writing geoprocessing scripts that integrate ArcGIS and Python.
The sys.exit() function allows the script to be halted immediately. This is a useful error handling technique as shown when you put in a year past the current year...
4. More on importing modules - and the "namespace" concept
In the above exercises, we imported the modules with the simple import statement. There are some variations on how to import modules that lead to different means of using the modules in your script. The exercise below examines a variety way of loading a module into your script.
» Exercise 4 - Alternative import statements
Type the following to import just the path component from the
osmodule:21from os import path2print path.join("C:\\temp","data.txt")This can be useful if we constantly use the
os.pathstatement in our script and want to avoid typingos.in front of the path. Seems insignificant in this case, but in writing long scripts with modules with long names, this can be handy.Type the following to import a module but as a shorter name:
21import win32com.client as win32c2dir(win32c)Again, this is serves mostly as a time saver in writing scripts by allowing us to type "win32c" instead of the full module name of "win32com.client".
Import all subcomponents of a module at the root level:
21from math import *2sqrt(25)Note that by importing everything, i.e. by using
*, we don't have to preface thesqrtfunction with themathmodule name (e.g. "math.sqrt") The above format of importing a module imports all the functions at the root level so that the module need not be included when executing the command.The danger in using these shorthand methods for importing and using modules in our scripts, however, is that functions can get confused when two modules share the same function name. For example, if both
moduleAandmoduleBhad a function called "factorate", and we imported both modules as...21from moduleA import *2from moduleB import *...then any time we use "
factorate" in our script, we couldn't be certain which module's "factorate" it would use.
Delete a module from the script/session:
11del pathThis "checks back in" the path module; its functions can no longer be used in your scripts.
5. Introduction to the ArcPy module
When ArcGIS is installed on a machine, a Python package called ArcPy also gets installed. When imported into a script, this module grants access to everything ArcGIS, allowing us to do virtually anything we can do in ArcGIS Pro from within a Python script. Before digging too deeply into how spatial analysis is done within Python, let's take a moment to get acquainted with ArcPy.
» Exercise 5 - A quick introduction to ArcPy
In the PythonWin interactive window, import ArcPy:
11import arcpyTake a gander at all the functions associated with ArcPy:
21funcList = dir(arcpy)2print(len(funcList))There are > 1100 functions associated with ArcPy!
Have a look at the raw help file for ArcPy:
11help(arcpy)Navigate to the top of this listing to where lists "PACKAGE CONTENTS", this lists all the sub-modules and sub-packages associated with ArcPy.
Under the PythonWin Tools menu, select Browser. In the Browse Python Object window, enter in one of the ArcPy package names (e.g. "arcpy.na" for Network Analyst), and click OK.
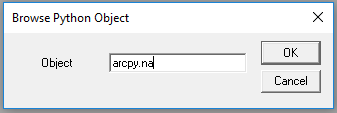
This gives you an interactive listing of all the Python functions and objects associated with the chosen sub-module. (This could also be obtained by typing "help(arcpy.na)" at the interactive prompt. )
Display the scripting syntax for a particular ArcPy command (here the Spatial Analyst slope function):
11help(arcpy.sa.Slope)Open up the ESRI help documentation on ArcPy and its function, classes, and modules (more on what these are will come later):
Familiarize yourself with the ArcGIS desktop help for specific functions.Open the link for the ListRasters function:
Scroll down to the Code Sample and look at the Python code snippet:
x1import arcpy23# Set the current workspace4arcpy.env.workspace = "c:/data/DEMS"56# Get and print a list of GRIDs from the workspace7rasters = arcpy.ListRasters("*", "GRID")8for raster in rasters:9print(raster)Do you understand what each line in this Python script does? Could you implement it for a workspace?
You should take a moment and familiarize yourself with all the resources available that provide information on both what's available in ArcPy and how to use it. The above examples all pull from documentation linked to the very version of Python you are using rather than some static document.
ESRI's Python package has evolved tremendously with each new version of ArcGIS. Consequently, any printed document or book on the shelf can become outdated quickly. Accessing information associated with the installation or on-line will (at least should) be kept up to date!
Summary
Other than listing some coordinates of Sara the turtle and importing the ArcPy module, these past three tutorials really have not dealt with spatial analysis or ArcGIS at all. But they have laid important ground work for writing useful and robust scripts that conduct spatial analysis.
By gaining command of numbers, strings, and collections within the scripting world we can manipulate the inputs and arguments for running ArcGIS commands via ArcPy. By writing scripts that can iterate through lines of text in a text document or items in a list, or that can execute statements only when a set of preconditions are met, we have a great deal of control over guiding an analytical workflow from start to end. And finally, by learning what Python modules exist and how to incorporate them into our scripts, we vastly expand the capabilities of our scripts.
What remains is gaining command of the ArcPy module so that we can build scripts that can do virtually anything that Desktop ArcGIS can do - and more, since we now have superior control over iteration, decision making, and even calculations from within a scripting environment than we do from interacting with the desktop user interface or even the model builder.
Up next, then, is one more tutorial that discusses the structure of the ArcPy module, how it's used to execute ArcGIS tools, set geoprocessing environments, interact with features data, create feature classes, and more.