ArcPy - Scripting with ArcPy
Introduction
In previous sessions, we covered the very basics of Python: variables, data types, controlling the flow of code (conditional and looping statements), and using modules. We also discussed the general steps in writing, running, and debugging Python scripts using PythonWin. Here, we build off our fundamental understanding of writing Python scripts (and get more practice with the concepts mentioned above) by learning the core techniques for using ESRI’s ArcPy module to write scripts that can perform entire geospatial analysis workflows.
The topics covered are listed below. NOTE: To run these, we'll need ArcGIS Pro installed, a cloned Python environment with PythonWin (or Spyder) installed, and the ArcPyDemo1 workspace (located here) downloaded and unpacked on your V: drive. Some exercises also require that the W: drive be properly mapped.
Learning objectives
ArcPy - Scripting with ArcPy♦ GIS operations from Python: 1. Running geoprocessing tools in Python (link)» Exercise 1a: Executing a tool using Python within ArcGIS Pro» Exercise 1b: Executing a tool using Python within an IDE►Key takeaways for running geoprocessing tools in Python:» Challenge!2. ArcPy functions (link)» Exercise 2: Functions3. ArcPy classes (link)♦ Properties♦ Methods» Exercise 3: Classes4. Using environment settings in Python (link)» Exercise 4: Getting and setting environment values5. Allowing user inputs in your script: sys.argv and arcpy.getParameterAsText()» Exercise 5: Using sys.argv6. Running python scripts from ArcGIS & sending status messages (warnings, errors, etc.) (link)» Exercise 6: Running scripts from ArcGIS Pro♦ Working with geospatial data: 7. Describing data (link)» Exercise 7: Describing data with the describe object8. Accessing, updating, and creating data using cursors (link) » Exercise 8: Working with Cursors 9. The Geometry object: Reading and Editing feature geometries. (link)Point objects vs. Point/Multipoint/Polyline/Polygon Geometry objects
♦ GIS operations from Python:
1. Running geoprocessing tools in Python (link)
One of the key features of ArcPy is its ability to run any ArcGIS tool from Python. Here we examine the fundamentals of running ArcGIS tools from Python. We begin by diving in, and then review a few approaches for teaching ourselves more about how to incorporate ArcGIS tools into out Python scripts.
» Exercise 1a: Executing a tool using Python within ArcGIS Pro
You may have, at one point or another, noticed that you can open a Python window from within ArcGIS. While this Python prompt is not suited for writing scripts (debugging is a challenge), it is useful for running specific Python statements. Here, we'll explore how ArcGIS commands are executed in Python from the ArcGIS Python script.
Unzip the
ArcPyDemo1.zipfile to yourV:drive and open the project. This is a sample dataset of the San Diego area including roads, a set of study quads, areas below 250 m in elevation and areas less than 40% slope.Open up the Python command line window in ArcPro: Analysis Tab>Python button.
At the Python prompt, type the following command to buffer the roads feature class 500 meters.
arcpy.Buffer_analysis('majorrds','rdsBuff_500m','500 meters')
Notice how the intellitype feature of ArcGIS helps you format the command and how some basic information on the tool is provided at the right hand side.
Also notice that there is no need, when running Python from within ArcGIS, to import ArcPy; it is imported automatically for obvious reasons. The Python prompt, however, works exactly like the interactive prompt in PythonWin.
Run the command and examine the output.
Use the
↑key on your keyboard at the Python prompt to scroll up to the Python statement you just ran.
Edit the command so that it now appears as below:arcpy.Buffer_analysis("majorrds","rdsBuff_500m","500 meters","","","ALL")
Here we've altered the command to dissolve all the output features. This option to dissolve is the 6th argument in the tool’s syntax. The first 3 are required, but we skip the 4th and 5th ones ("line_side" and "line_end_type") by supplying empty strings, to get to the 6th. Arguments are supplied in a specific order; we cannot skip arguments to get to a specific one. Instead we can supply empty strings to assign default values. We'll talk more about command parameters shortly.
The outputs of the above commands are added to the map, and as part of our map, we can use these outputs in later Python commands just as we did the original feature classes. Alternatively, we can assign the outputs to Python variables and use them in subsequent commands:
bufferedFeatures = arcpy.Buffer_analysis("majorrds","rdsBuff_500m","500 meters")
Where are we writing all these outputs? Check the environment settings to see whether that's determining where they are saved. Turns out that we have to be explicit about path name if we want to control where the outputs go. We can do that with variables:
outFC = "V:\\ArcPyDemo1\\Scratch\\clippedBuffers.shp"clippedBuffers = arcpy.Clip_analysis(bufferedFeatures,"elevlt250",outFC)
The Python window in ArcGIS is a good way to dive into using tools in Python and should shed a bit more light on how to go about running tools via Python. The intellitype feature and the brief help were useful in structuring our syntax, but there are other places to go to get a more thorough explanation of how specific tools are used in Python.
» Exercise 1b: Executing a tool using Python within an IDE
Here we'll do a task similar to what we did in the previous example, but from entirely within PythonWin. We'll create a script that selects roads of a certain class value and buffers them a given distance.
In the scripts folder of the
ArcPyDemofolder, create a new Python script.View the help on the Select (Analysis) tool (here's a link). Scroll down to the end of the page to see an example of how the tool is used in Python. Let's start by copying what ESRI gives and tailoring it to our example. Copy the Select Example 2 (stand-alone Python script) to the clipboard and paste it into your Python script:
x# Name: Select_Example2.py# Description: Select roads of Class 4 from major roads tin the gnatcatcher habitat study area# Import system modulesimport arcpy# Set workspacearcpy.env.workspace = "C:/data"# Set local variablesin_features = "majorrds.shp"out_feature_class = "C:/output/majorrdsClass4.shp"where_clause = '"CLASS" = \'4\''# Execute Selectarcpy.Select_analysis(in_features, out_feature_class, where_clause)Change
arc.env.workspaceto point to the "SanDiego "folder within your data folder:V:/ArcPyDemo1/Data/SanDiego. (This directory, coincidentally also contains a shapefile calledmajorrds.shp!)Change the
out_feature_classvariable so that themajorrdsClass4.shpshapefile is created in yourscratchfolder.Save and run the Python script. Then check your scratch folder to see whether the file was created. (A link to working code is here)
Now, let's add another set of commands to buffer our "class 4" roads.
buffRoads = "V:/ArcPyDemo1/scratch/BufferedRoads.shp"buffDist = "500 meters"arcpy.Buffer_analysis(out_feature_class,buffRoads,buffDist,'','','ALL')Something things to keep in mind:
out_feature_classis actually the input for this tool;buffRoadsis the tool output. Also, as in the preceding example, we have two "placeholder" inputs (the empty strings) for the two optional parameters, so that we can assign "ALL" as the dissolve option.Run the script and examine your scratch folder. Or better yet, open the outputs in ArcGIS. (Working code link.)
→ Note you'll have to manually delete the
majorrdsClass4.shpfile each time you run this. Well see how to fix this soon!
►Key takeaways for running geoprocessing tools in Python:
- You need to import
arcpyto gain access to the geoprocessing tools. - Implementing a geoprocessing tool is mostly a matter of using the correct syntax. Looking up the tool in the ArcGIS Pro help reveals what the proper syntax is along with code samples.
- The order and position in which parameters are specified is important. If you want to set the "dissolve_type" of the buffer command, and its the 6th parameter listed in the tool's documentation, you need to be sure enter it as the 6th parameter, using empty strings as placeholder for preceding parameters, if not used.
- Datasets are referenced to by their path on the machine. This goes for tool inputs and outputs. [Though if you are using Python within an ArcGIS session, the layers loaded into your current map are available as tool inputs...]
» Challenge!
- How would you alter the above script so that it allowed the user to specify the buffer distance?
What about the output file? - Could you modify the above script so that it buffered the selected roads three different distances - say 500, 1000, and 1500 meters - creating a separate output shapefile for each?
2. ArcPy functions (link)
Functions in ArcPy execute a particular task within a script and can be incorporated into a larger program. All ArcGIS geoprocessing tools are accessible as ArcPy functions, but not all functions are necessarily provided ArcGIS tools. Functions can, for example, return a list of fields within a table, set the analysis cell size, or extract the extent of a feature class.
A full list of ArcPy functions is available here:
http://pro.arcgis.com/en/pro-app/arcpy/functions/alphabetical-list-of-arcpy-functions.htm
The following exercise offers some example applications of ArcPy functions...
» Exercise 2: Functions
→ First we'll investigate the Exists function (link):
Use the ArcPy
Existsfunction to return a Boolean indicating whether theW:\859_data\SanDiego\climate.dbffile exists.Reveal code
arcpy.Exists('W:\859_data\SanDiego\climate.dbf')
→ Now we'll explore the ListFields function (link):
Use the ArcPy
ListFieldsfunction to generate a list of all the fields in theW:\859_data\SanDiego\climate.dbftable, saving the output as a variable named "myFields".What is the Python data type of the
myFieldsvariable you just created?How many fields are in the table?
Extract the first item in this list into a new variable named "
myField".What is the Python data type of this "
myField" object?Reveal code to get answers
myFields = arcpy.ListFields('W:\859_data\SanDiego\climate.dbf')
type(myFields)
len(myFields)
myField = myFields[0]
type(myField)
→ Challenge!
Can you generate a list of just the "String" type fields in the
W:\859_data\SanDiego\climate.dbfdataset?Reveal answer
stringFields=arcpy.ListFields('W:\859_data\SanDiego\climate.dbf','','String')
3. ArcPy classes (link)
In the exercise above, the ListFields function returns a list. Each item in this list is a field object; more precisely, each item is an ArcPy object belonging to the field class.
A class is roughly the same as what we've been calling "data type". All scripting objects (that is, anything we can assign a variable to in Python) belongs to a class. And the class to which it belongs determines what properties can be assigned to the variable, and what we can do with the variable, or its methods.
To use a familiar example, in the code myName = "John", the variable myName become an instance of the Python string class. and thus inherits all the properties (its length, whether it's alphanumeric, etc.) and all the methods (split, index, upper,…) defined by the Python string class.
ArcPy has many, many of its own classes. Some examples are point, field, extent, and value table (e.g. for use in reclassifications). A full list of Classes available in ArcPy is available here
http://pro.arcgis.com/en/pro-app/arcpy/classes/alphabetical-list-of-arcpy-classes.htm
As in all of Python, classes are used in ArcPy to create objects that have a specific set of properties and methods. For instance, the following statement creates a new point object, meaning a script variable assigned to the ArcPy “point” class:
MyPoint = arcpy.Point()The MyPoint variable is now said to be a “Point object”, and it therefore assumes the defined properties and methods of any ArcPy point, listed here: http://pro.arcgis.com/en/pro-app/arcpy/classes/point.htm . What then are these properties and methods??
♦ Properties
An object’s properties define or describe an object. For example, our point object has properties that define its X, Y, and Z coordinates, as well as a measure and ID property.
We can set our point’s X and Y coordinates as follows:
myPoint.X = -84.3332myPoint.Y = -32.0212Some properties can be both read and changed within a script: a point object can be moved by changing its X and Y property values. However, other properties can only be read. An example would be a raster object’s “format” property which indicates what kind of raster it is (e.g. GRID, TIFF, etc.), and can only be changed by converting the raster, not simply by changing its property value.
♦ Methods
An object’s methods are all the actions that you can perform using the object. For example, a point object has a method called “within”:
isWithin = myPoint.within(someOtherShapeObject)This method allows you, via a script, to determine whether a point falls within another [point, line, or polygon] object.
Classes, properties, and methods are by no means unique to ArcPy. In fact, whenever we assign a variable in Python, is becomes the member of a class – which class is discovered using the type() function. For example, if we assign X = “Python is fun”, X becomes a member of the Python string class, and it has properties (e.g. a length, whether it’s upper case) and methods (capitalize, replace) of its own.
» Exercise 3: Classes
Create an ArcPy point object:
myPoint = arcpy.Point()Assign values to the X, Y and ID properties of the point object:
myPoint.X = 6273762myPoint.Y = 1878232myPoint.ID = 1Extract the first polygon from the San_Diego study_quads.shp feature class (don't worry how this is done quite yet…)
myPoly = arcpy.SearchCursor("W:\\859_data\\SanDiego\\study_quads.shp").next().ShapeUse the Point's within method to see whether our point is within the polygon.
print (myPoint.within(myPoly))List some properties of the
myPolypolygon object.- What is it's area?
- How many points is it made of?
4. Using environment settings in Python (link)
Environment variables, such as the current and scratch workspace locations, are set as properties of the ArcPy env class. Setting these can be useful and, in some cases, essential. An example of this is seen in Exercise 1b above where we set the "workspace" environment variable (env.workspace = "C:/data"); in doing so, we no longer have to supply full paths to the "majorrds.shp" dataset as ArcPy now assumes the dataset exists in the current workspace.
Environment variables work just as they do in the ArcGIS Pro application: once set, other procedures can refer to those values which facilitates coding.
» Exercise 4: Getting and setting environment values
Import ArcPy and set the current workspace to "W:\859_data\SanDiego"
import arcpyarcpy.env.workspace = "W:/859_data/SanDiego"We can set the
outputCoordinateSystemvalue to force our processes to create output in a specific coordinate system:arcpy.env.outputCoordinateSystem = arcpy.SpatialReference("WGS 1984")Another environment setting allows us to overwrite the output, if it exists
arcpy.env.overwriteOutput = TrueNow, let's re-run the remaining code we did in Exercise 1b...
# Set local variablesin_features = "majorrds.shp"out_feature_class = "majorrdsClass4.shp"where_clause = '"CLASS" = \'4\''# Execute Selectarcpy.Select_analysis(in_features, out_feature_class, where_clause)Where did the output go? What projection are the files in?
5. Allowing user inputs in your script: sys.argv and arcpy.getParameterAsText()
We can reuse scripts we write by editing the inputs in the script itself, e.g. changing paths to point to different input feature classes or applying different buffer distances. However, it’s far more elegant to instead specify certain variables in our script to be user inputs with values specified at run time. Python enables user input via the argv object, which is contained in the sys module - otherwise called the sys.argv object.
The sys.argv object is, in computer jargon, an argument vector - which just means it’s a list containing arguments. The values of this list are supplied when the user runs the script, either from within PythonWin or ArcGIS. (More on that in a bit...)
» Exercise 5: Using sys.argv
- Write a new Python script using the following lines of code to see how
sys.argvworks...
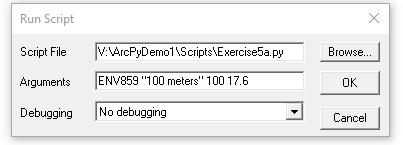
import sysclassName = sys.argv[1]distance = sys.argv[2]A = sys.argv[3]B = sys.argv[4]Now we'll run the script in PythonWin. Click the Run icon and in the Run window fill in the arguments in the Arguments line as shown below. Note that each argument entered is separated by a space. Since the second argument has a space in it, it's enclosed in quotes.
Note: if you are using Spyder, you add run-time parameters from
Run>Configuration per file(orctrl-F6) and then enter your inputs by checking theCommand line options:box and entering your inputs (separated by spaces) in the line)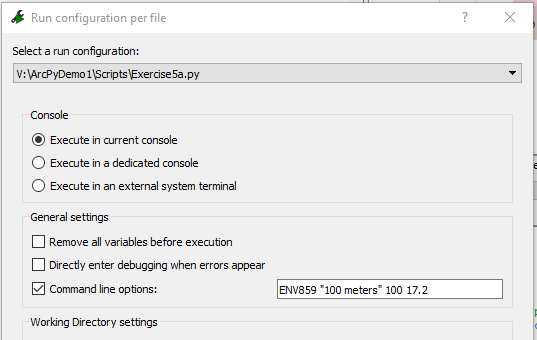
After the script is run, we can examine the variable values in PythonWin's interactive window:
print(distance)Print the sum of
AandB. What does the result say about the data types passed into your script via thesys.argvtechnique?The
sys.argvitself is a list. What is the first element in this list?
ArcPy has its own version of sys.argv that allows values to be passed into Python scripts: arcpy.GetParameterAsText(). More on this function here: http://pro.arcgis.com/en/pro-app/arcpy/functions/getparameterastext.htm. It works just like sys.argv. With one key exception: GetParameterAsText does not include the scripts name as its first element, so user inputs begin at position "0" in the list.
Why use one over the other? sys.argv has limitations on the number of characters it can accept. GetParameterAsText has no character limit. So it would seem the latter is the better choice. However, as we'll see later, it's sometimes useful to know the name of the script that stored as sys.argv[0] -- and sys.argv does not require an expensive ArcGIS license, so it's useful to know both are at your disposal.
6. Running python scripts from ArcGIS & sending status messages (warnings, errors, etc.) (link)
Now that we have a way of specifying user input in our scripts, we can link our code back to ArcGIS Pro as script tools, i.e., so that they can be run as tools in a geoprocessing model. We can also set our scripts to send messages back to the ArcGIS Status window -- as opposed to "printing" messages to an interactive window that wouldn't appear when run from ArcGIS.
» Exercise 6: Running scripts from ArcGIS Pro
Create a new Python script named
Exercise6.pywith the following lines of code:import arcpy#Set variable names to the 4 user inputsclassName = arcpy.GetParameterAsText(0)distance = arcpy.GetParameterAsText(1)A = arcpy.GetParameterAsText(2)B = arcpy.GetParameterAsText(3)#Message results back to the status window when runarcpy.AddMessage("The class name is {}.".format(className))arcpy.AddWarning("The distance is {}.".format(distance))arcpy.AddError("{} + {} = {}?!".format(A,B,A+B))Run your script (using
ENV859 "100 meters" 100 17.6as inputs) to ensure it has no errors. Nothing should be printed to your interactive window. Why?Open your
ArcPyDemo1.arpxArcGIS Pro project.Right click on your toolbox and select
New->Scriptto being adding your script as a script tool.Give your script a name, label, and then link it to your
Exercise6.pyscript file.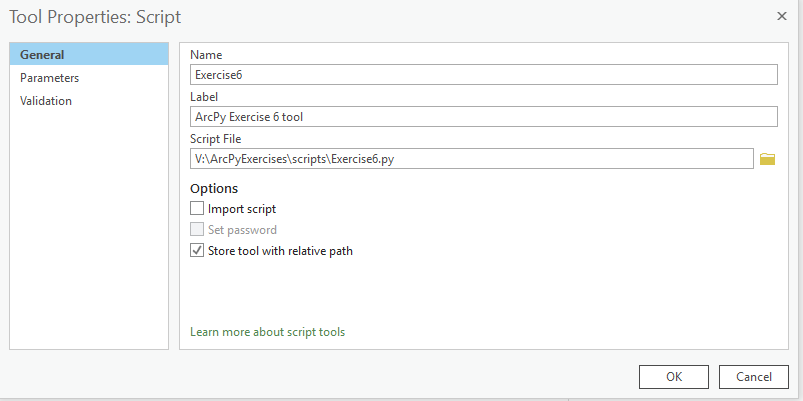
Click on the
Parameterstab to add our 4 script arguments, in order and with the proper data types. The Label and Names can be whatever you want; they don't have to match any particular code in your Python script.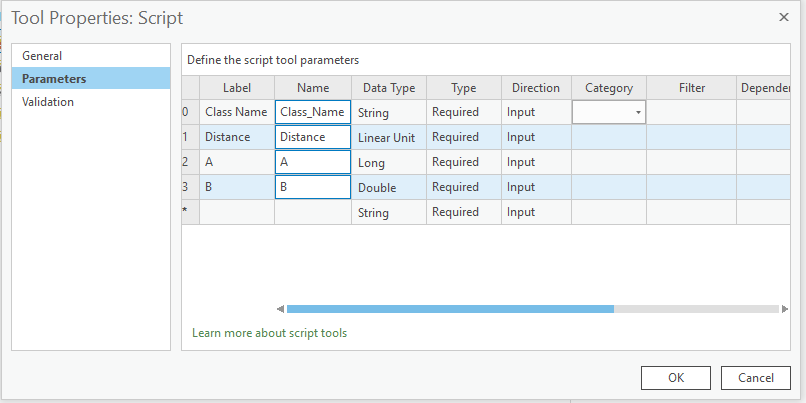
Run your script and note the messages in the status window.
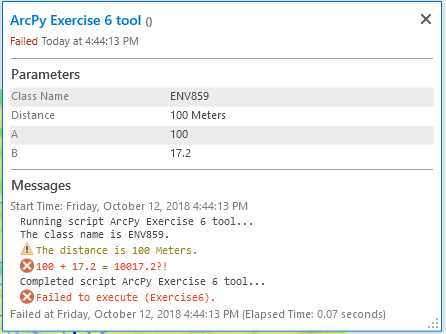
Note how the
addMessage,addWarningandaddErrormessages were presented in the display. Also note the indication that your script has "failed to run" even through it ran as expected. This is because theaddErrorline was run, which always causes the status window to indicate failure.
♦ Working with geospatial data:
7. Describing data (link)
When writing a script for a certain purpose, you may run into a case where you need to know some property of a given geospatial dataset. What is its extent? Is it a point or a polygon feature class? Is it a floating point or integer raster? How many bands does the raster have? What is its spatial reference?
All these questions are answered by creating a describe object for a given dataset, which is simply a Python dictionary listing all the dataset's properties. Here is an example of how to create a describe object, here assigned the variable name dsc for the climate.shp shapefile in the W:\359Data\SanDiego workspace.
» Exercise 7: Describing data with the describe object
# Scripting with ArcPy: Exercise 7 - Describing data## This script demonstrates how a "describe" object is created and used. import arcpyfc = "W:\\859_data\\SanDiego\\climate.shp"dsc = arcpy.da.Describe(fc)Once created, the describe object allows us to extract properties of the climate.shp file. These two lines print out the name of the Object ID field (i.e., each row's internal ID) and whether the climate feature class has a spatial index associated with it.
print (dsc['OIDFieldName'])print (dsc['hasSpatialIndex'])To show how this might be use programmatically, we can add these two lines which build a spatial index for the climate.shp feature class, but only if it doesn't have one already:
if not dsc['hasSpatialIndex']: arcpy.AddSpatialIndex_management(fc)The describe object is a bit tricky in that it is dynamic: its properties vary on what type of dataset is being described. For example, a raster dataset has a "cell size" property, but a feature class would not. However, as the describe object is structured as a Python dictionary, we can easily reveal all the properties associated just by looking at the object's keys:
print(dsc.keys())Note: Describe objects in previous versions of ArcPy returned were a different, more unwieldy data type, not a dictionary. In fact, this describe object can still be created using the legacy format:
arcpy.Describe()(thedais dropped). I see no reason to use this option, though you can read about it here. It's a real pain to use relative to the dictionary returned byarcpy.da.Describe()and is only kept for support of old scripts...
8. Accessing, updating, and creating data using cursors (link)
Reading and writing data in a feature attribute table is much like reading and writing lines of text in a text file using Python's "file object", though there are a few key differences. In ArcPy, instead of a file object, we link to a feature class, table, or raster attribute table using a cursor. These cursors come in three flavors:
• Search Cursors are used simply to retrieve individual features;
• Update Cursors are used to retrieve and edit properties of individual features;
• Insert Cursors are used to append new records to a table and set their values.
When we create these cursors, we have to specify the data table and the fields in the table we want to retrieve. Optionally we can provide a "where clause" to filter the rows returned. The constraint with cursors, as is the case with file objects, is that data can only be access sequentially: if you want to edit the 100th record, you have to move past the first 99 to get to it. However, supplying the where clause can often be used to narrow in on just the rows you want.
Once a cursor is created, we can use a loop (for or while) to iterate through existing records in search and update cursors. Each iteration returns a "row" object, which is a list of field values created in the same order we specified when creating the cursor.
Here, we'll only examine the Search Cursor. The ArcGIS Pro online help provides good explanations and examples how the other cursors work. Below is a script example that creates a search cursor for the climate.shp feature class in the SanDiego workspace. (Note that this feature class has two attributes: Climate_ID and Zone which are referred to in the script below.)
» Exercise 8: Working with Cursors
Copy and paste the following into a new Python script:
#Scripting with ArcPy: Exercise 8 - Using cursors and the geometry object## This script demonstrates how cursors are used to# process records in an attribute table, on at a timeimport arcpy# Specify the feature class, raster, or table to examinefc = "W:\\859_data\\SanDiego\\climate.shp"# Create a cursor (this is like opening a file)rows = arcpy.da.SearchCursor(fc,['Climate_ID','Zone'])# Use a For loop to iterate through all rowsfor row in rows:climateVal = row[0]zoneVal = row[1]# Print the values for the fields we specifiedprint('The climate is {} and the zone is {}'.format(climateVal,zoneVal))Run the code and you should see "climate_ID" and "Zone" values returned for the two records in the climate dataset. The result should appear as below::
The climate is 2 and the zone is Includes climate zones 1 and 2The climate is 3 and the zone is Climate zone 3Alter the code so that instead of extracting and printing the "
climate_ID" and "Zone" fields, you extract and print theFIDandShape@areafields and values. The result should be the following.The FID is 0 and the area is 5675863522 m2The FID is 1 and the area is 1550644940 m2
9. The Geometry object: Reading and Editing feature geometries. (link)
In the above example, we modified our code to extract Shape@area to return the area of our feature. The bit after the @ is termed the "token" and there are other "tokens" besides "area" that we can used to pull values from geometry fields (link). However, had we omitted the tokens and just specified Shape@, the value returned would be an ArcPy geometry - in this case a polygon object since our dataset is a polygon feature class.
This is useful because, once we have a specific geometry object, we can do various things to it programmatically...
» Exercise 9: Reading Geometries from a Feature Class
Alter the code created in Exercise 8 so that
Shape@is included when creating the cursor, and also, in the loop, a variable calledfeatureis assigned to the value in theShape@field.Copy and paste the following code to get the polygon object from the first feature in the "Climate.shp" dataset.
import arcpyfc = "W:\\859_data\\SanDiego\\climate.shp"rows = arcpy.da.SearchCursor(fc,['Shape@'])row = rows.next()feature = row[0]What is the data type of the
featurevariable?Use the
dir()function to list what we can do with this object.- What is the length of this feature?
- Extract the spatial reference of this feature to a new variable; what is the type of that variable?
Create a new ArcPy Point object located at X = 6283500, Y=1896150:
myPoint = arcpy.Point(X=6283500,Y=1896150)An now see if that point falls within the
featureprint(feature.contains(myPoint))
Point objects vs. Point/Multipoint/Polyline/Polygon Geometry objects
In the above example, the coordinates used to define myPoint are assumed to be in the same coordinate system as feature. But what if they weren't? How would we specify the spatial reference of our point? The answer reveals a subtle difference between two ArcPy classes related to the Geometry class.
An ArcPy Point object is the most fundamental spatial element in ArcPy. It's defined by its X-Y (and sometimes Z or M) coordinate properties, but the Point object does not have any spatial reference property to define what coordinate system these values are in.
A Point Geometry object, however, does have a spatial reference property. And thus, if we wanted to query whether a point falls within a polygon and the point's coordinates are in a different coordinate system, we'd have to first construct a Point object and then construct a Point Geometry object from that point and define its coordinate system. (ESRI seems to go out of its way to make projections, etc. difficult!)
» Exercise 9b: Point Geometries
Let's look at an example: Use the following code to see if out myPoint defined in geographic coordinates falls within the feature.
lat = 32.8661930lng = -117.1559074myPointDD = arcpy.Point(lng,lat)spatialRef = arcpy.SpatialReference(4326)myPtGeomDD = arcpy.PointGeometry(myPointDD,spatialRef)print(feature.contains(myPtGeomDD))Like Point Geometries, other geometry classes (Multipoint, Polylines, and Polygons) are also constructed of Point objects - or just raw coordinate pairs provided arrays (i.e. Python lists). And spatial references can be assigned to these objects at the time they are constructed or later, via their spatialReference property.
♦ Summary
Clearly, ArcPy does much, much more than what we covered here, but this should at least serve to orient you on how ArcPy is structured and were to go. Really, the key takeaways are:
- Geoprocessing tools can be run in Python; you just need to know the correct syntax.
- ArcPy contains other functions besides geoprocessing tools, and they also just require using the correct syntax.
- Many inputs, including feature and raster datasets, are referenced by file paths stored as string variables. But some, more complex inputs are other Python programming objects, or classes, of which ArcPy includes many.
- Setting ArcPy environment values via
arcpy.envare a useful means to set default values for workspaces, extents, etc for your ArcPy processes. - Python scripts can be added to an ArcGIS Pro tool box, with the arguments between ArcGIS and the Python scripts passed as string objects via the
sys.argv[]orarcpy.GetParameterAsText()techniques. Also, status and other messages generated in the Python script can be sent back to the ArcGIS Pro application as the tool is running. - ArcPy also allows us to programmatically access and describe ArcGIS datasets through cursors - as well as extract, create and edit spatial features via geometry objects.
From here, it's mostly a matter of getting more experience under your belt to become proficient in using ArcGIS in Python.