ArcPy: Writing a geoprocessing script - Part 2
ArcPy: Writing a geoprocessing script - Part 2Part I - RecapSetupPart II♦ Creating features from the observation track data5. Creating an empty feature class (to hold our observation points)5a. Learning the syntax for the ArcGIS Create Featureclass tool and adding it to our script5b. Adding a spatial reference parameter to the CreateFeatureclass tool. 5c. Enabling our script to overwrite outputs5d. Adding attributes to our newly created output feature classDebugging 😞6. Creating a point object from our locations data and adding it to the feature class6a. Creating the point object using our lat/long coordinates○Debugging - again 😞→ Python error messages...→ ArcGIS error messages via arcpy.GetMessages()→ Walking through code→ print() statements and examining variable values at various stages in our code6b. Inserting the point object and attribute values into our feature class♦ Cleanup & Final Touches7. Iterating through all ARGOS data files8. Linking our tool with ArcGISWhere to go from here?
Part I - Recap
Recall that our overall goal here is to extract meaningful data from the series of raw ARGOS data files and construct a useful ArcGIS Feature class of the data. Here is our intended workflow.
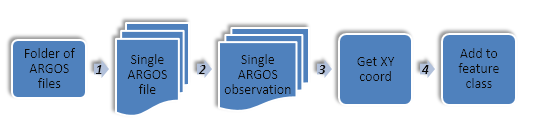
Up to this point, we've created code that reads in a single ARGOS data file, iterates through each location record, and parses out key information from that record including the record number, date, time, location class, and geographic coordinate.
Here, after taking a tour of the ArcPy module that we'll need to continue, we proceed with the remainder of our objectives:
- We begin with creating an empty feature class, which will store our ARGOS locations.
- Next, we'll construct ArcPy point objects from the data in our ARGOS file.
- Then, we'll add, iteratively, these points to our created feature class, along with attribute data.
- Finally, we'll tweak our code so that it can read the contents of a folder of ARGOS data vs. just the one.
Setup
To resume work, navigate to your ARGOSTracking workspace and open up your ImportARGOS.py script in PythonWin.
If needed, the code from where we are starting is found here.
Part II
♦ Creating features from the observation track data
From Task 2 in Part 1, we now have all the information we need to create a point feature and add it to a feature class, attributes and all. The two key scripting sub-tasks we need to do are (1) create an ArcPy point object from the coordinate information, and (2) add this to our output feature class as a new feature, accomplished using the ArcPy InsertCursor function. The ArcGIS help on the InsertCursor function has a short example from which we should be able to figure this out.
5. Creating an empty feature class (to hold our observation points)
5a. Learning the syntax for the ArcGIS Create Featureclass tool and adding it to our script
Before we can add any features to a feature class, however, we need to create the feature class. We'll use the ArcPy Create Featureclass tool to create the feature class, and then we'll use the AddField tool to add a few fields to hold attributes of our feature: the Tag ID, the date it was collected, and the Location Class (LC) of the ARGOS reading.
Consult the documentation on the Create Featureclass tool. You'll find that you have to supply the name of the feature class in two parts: a file path and a file name. So you'll have to add a bit of code to split your outputFC variable into its path and name components. The "os.path.split" function does this. (The os.path module is good for many file manipulation operations; consult the Python help documents for more information.)
- Insert the following code just below the code section where we set the input variables (i.e. at Line 20)
## Prepare a new feature class to which we'll add tracking points# Create an empty feature class; requires the path and name as separate parametersoutPath,outName = os.path.split(outputFC)arcpy.CreateFeatureclass_management(outPath, outName)Run the code to make sure it works. If so, commit to the Git repository.
Note: if you run this more than once, you'll get an error because the file exists. If so, manually delete the file -- for now...
5b. Adding a spatial reference parameter to the CreateFeatureclass tool.
The above code snippet includes only the required parameters of the CreateFeatureclass tool. It will default to a point feature class, with no "m" or "z" values, and have no defined spatial reference. Having no "m" or "z" values is fine, but we should address the fact that the spatial reference is undefined. Our options are: (1) leave it undefined; (2) hard-code it to be a specific spatial reference, or (3) allow the user to set it as an input variable. We'll choose the third option as it’s easy enough to do, and it makes our script that much more flexible.
To do this, however, we should add a new entry in our list of input variables. Later, we'll set this as an input parameter (sys.argv[3]), but for now we'll hard wire it to the "World Equidistance Cylindrical" projected coordinate system.
There's a catch here, however. Unlike setting a variable's value to a number or string, we're setting it to an ArcGIS Pro spatial reference object. So what exactly to we put on the right side of the = ?
To answer this, have a look a the ArcGIS Pro help on the spatial reference class. You'll see a few ways to create a spatial reference object linked to a specific coordinate system; we'll use the WKID option. You could look up the WKID associated with "World Equidistant Cylindrical" in the PDF ESRI provides, but I suggest a different way:
- Open ArcPro, using either a new or an existing project.
- Open up a tool that has a spatial reference as an argument, e.g. the
Create Featureclasstool - Click on the globe to access the "Coordinate System" selection wizard.
- Navigate to
Projected>World>Equidistance Cylindrical (world). - Select
Detailsand this will open a window revealing the WKID of the Coordinate system: 54002
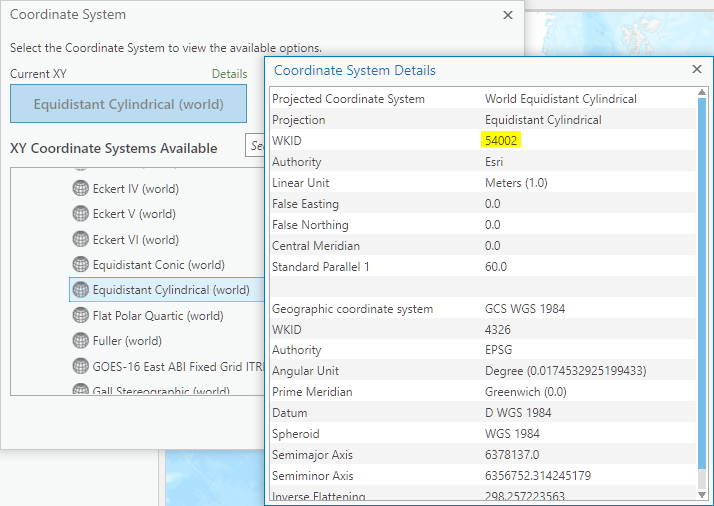
Now that we have the WKID, we can create the spatial reference variable:
Insert the following line just below line 18 where we set the
outputFCvariable:outputSR = arcpy.SpatialReference(54002)And then we can update the
CreateFeatureclassstatement (now line 24) to include the spatial reference object:arcpy.CreateFeatureclass_management(outPath,outName,"POINT","","","",outputSR)Delete the
ARGOStrack.*files in your Scratch folder, and run the code again to ensure it works.
5c. Enabling our script to overwrite outputs
We'll take care of this error, common when developing a script, by allowing ArcPy to overwrite output:
Insert the following line after importing the
arcpy(at line 15) module to allow outputs to overwrite files.arcpy.env.overwriteOutput = TrueRun the code. It should work without error again. Commit to Git.
5d. Adding attributes to our newly created output feature class
When we create a new feature class (and don't specify a template) it won't include any additional attributes, so we'll have to add those programmatically. This is done with the AddField command, part of the management toolbox. We'll want to add the fields after we've created the feature class, but before we start iterating through the ARGOS data records.
- Insert the following into lines 27-30 of our script:
# Add TagID, LC, IQ, and Date fields to the output feature classarcpy.AddField_management(OutputFC,"TagID","LONG")arcpy.AddField_management(outputFC,"LC","TEXT")arcpy.AddField_management(outputFC,"Date","DATE")- Run the tool. Uh-oh! Red text!! What'd we do wrong??
Debugging 😞
Debugging, the process of finding and fixing errors, is a fact of [coding] life. Sometimes the error is easily spotted and fixed; sometimes not. Either way, it's best approached with a bit of sleuthing. Errors come in three flavors: syntax errors, coding errors, and logic errors:
- Syntax errors are commands that Python doesn't understand. These are easy to spot when using an IDE like PythonWin as the IDE will refuse to run any code and often will reveal which line it can't understand. Our current error is not a syntax error because Python started to run just fine.
- Coding errors are problems that arise when the script is run, e.g. calling a variable before it has a value. These result in error messages, i.e. the red text, which sometimes offers a useful clue such as what caused the error and where. These are harder than syntax errors to fix because sometimes we have no idea what is causing them. A coding error is what we have here, and we'll go through a strategy for fixing it, in a bit...
- Logic errors are the nastiest ones because they don't trip any alarms; the code runs smoothly to its end, but the output is just not as it should be. It's always good to check your code output to ensure it makes sense. And if not, then you'll need to comb carefully through your code, checking the values of variables as they change to make sure all the inputs, flow controls, calculations, and iterations are running as you wish. Getting back to our coding error, we first look at the error message. Any clues? Ours states NameError: name 'OutputFC' is not defined". We could search our code for "OutputFC", which in this case could work. Or we could step through our code using the "Step Over" tool in the debugging toolbar.
- Step thru your code one line at time until the error occurs.
- Examine the code in the line where the error occurs.
- Fix the error and run the code again.
- Once you have your code working, consider committing the changes to your Git repository.
6. Creating a point object from our locations data and adding it to the feature class
6a. Creating the point object using our lat/long coordinates
Insert the code below within the ARGOS file read loop at Line 65 - after where we have extracted the observation attributes (
TagID,obsDate,obsTime,obsLC,obsLatandobsLon), but before thelineStringis updated to the next row in the inputFileObj file object; in other words, right where we previously had theprintcommand in the existing version:# Construct a point object from the feature classobsPoint = arcpy.Point()obsPoint.X = obsLonobsPoint.Y = obsLatTry running the script to see that it works as expected.
Sadly, we get the error
RuntimeError: Point: Input value is not numeric.
○Debugging - again 😞
→ Python error messages...
As before, let's initiate our debugging effort by trying to narrow down where exactly the error occurs. First, the Python error message fails to reveal exactly which line broke our code, so we dig deeper....
→ ArcGIS error messages via arcpy.GetMessages()
If the error is linked to an ArcPy geoprocessing operation, an ArcGIS error is generated - the one that we'd see if we were running a tool in ArcGIS Pro . However, these messages are not displayed within Python; instead, we need to explicitly call the arcpy.GetMessages() command, which reveals all messages (status/error/warning) that would be displayed if the too were run within ArcGIS Pro:
- At the interactive prompt, type
print(arcpy.GetMessages()).
The result is probably similar to:
Start Time: Wednesday, October 24, 2018 11:56:14 AMAdding Date to ARGOStrack...Succeeded at Wednesday, October 24, 2018 11:56:14 AM (Elapsed Time: 0.10 seconds)
which does not reveal any error here (just the status from successfully running the addField command). So the issue is not with an ArcPy processes, and we keep digging...
→ Walking through code
We could walk through each line of our code, but we'd' find that the error occurs somewhere in our loop: that would be a lot of walking...
→ print() statements and examining variable values at various stages in our code
However, we do have a print() statement in our loop, and we see it executes once before crashing. That tells us that it's crashing before it can fully process the second location record in our data. Let's test whether the bug is in lines 54-56, where we are trying to construct the point.
To do this, examine the value of the variables used in the commands. At the Python interactive prompt, type:
print (obsLon)
Aha! That's not a number - and the obsPoint.X = statement is expecting a number! It's a string and it can't even be converted to a number because of the W at the end. So, we need to add some code that strips off the "W" (or "E") from the longitude values and the "N" (or "S") from the latitude values. What more, however, is that we - knowing our geographic coordinate systems - need to set any coordinate west of the prime meridian or south of the equator to negative values.
Add the following code to fix our raw coordinate data to actual numeric coordinate values. Insert it after the
printstatement in line 63.# Convert raw coordinate strings to numbersif obsLat[-1] == 'N':obsLat = float(obsLat[:-1])else:obsLat = float(obsLat[:-1]) * -1if obsLon[-1] == 'E':obsLon = float(obsLon[:-1])else:obsLon = float(obsLon[:-1]) * -1Run the code to see if it works.
More errors! But if you look at the output, we see that some Lat/Lon values are listed as "???????", which cannot be converted to numbers whatever we do. This is where we have to make a decision: do we comb through our input files and write code for every exception encountered, or do we accept what we should reasonably expect and just skip the rest, perhaps letting the user know any records that failed our criteria? In our case, we'll go with the latter, and we'll handle this with Python's try and except duo.
First, indent lines 65-81. These are the lines in which we want to trap any conversion errors.
Just before those indented lines (at line 65), insert a
try:clause, with a comment.x#Try to convert the coordinates to numberstry:And just after the indented (now at line 83), insert the
except:clause (at the same indentation level as thetry:clause) and some code to handle an error, if it should arise.#Handle any errorexcept Exception as e:print("Error adding record {} to the output".format(tagID))And run the code, check the output for expected results. If all is good, commit to the Git repository.
We handled the error well enough so that our script will run. However, we could have been much more thorough with reporting the error. For example, we could have added the script to tally how many errors occurred and provided the user some indication of how many records were skipped. Or, perhaps even more useful, we could have written a record of all TagIDs having errors to a log file so that the user could have some documentation of what records are missing from the output and why.
6b. Inserting the point object and attribute values into our feature class
So now our code can loop through all the records in the ARGOS data file, extract specific values to variables, and create an ArcPy point object. Next up, we need to add all that information into our output feature class as a feature and its attributes. Recall from our review of the ArcPy package that this is done with an insert cursor.
We'll add code to construct our insert cursor object outside of the loop reading all ARGOS records. Then, inside the loop, we'll add code that creates a new feature row object and subsequently assigns values to all the attributes, including the Shape@ attribute which will store the point feature created above:
Insert the following code to create an insert cursor for our newly created feature class. Place the line anywhere after the creation of the feature class and its attribute fields but before the
whileloop begins:# Create the insert cursorcur = arcpy.da.InsertCursor(outputFC,['Shape@','TagID','LC','Date'])Then, inside our loop, anywhere after the
obsPointobject has been created, add code to create a new feature and update its attribute values. (Note: should you put this inside thetry-exceptstatements? There's no correct answer for that, BUT as far as debugging, it's best to keep code outside so that any errors will be revealed and addressed versus just passed over)# Create a feature objectfeature = cur.insertRow((obsPoint,tagID,obsLC,obsDate.replace(".","/") + " " + obsTime))Finally, add a line of code to delete the cursor object, releasing the lock on the feature class file. Places this in your code so that it occurs after your loop has completed (i.e. after all records have been added).
#Delete the cursor objectdel curTry running the script now. Does it complete? Scan the output to the interactive window and see if any errors were handled.
Now take a look at the output in an ArcGIS map. Are things looking good? (Hint: sites that cluster in a very small area in the "armpit" of Africa, i.e., at Lat/Lon 0°,0° are likely wrong...) All the attributes included in the attribute table? Points appearing in what looks like a reasonable location?
Turns out, we never specified the spatial reference of the input X and Y coordinates of our points, so it remained undefined - and incorrect. To attach a spatial reference to a point, we actually have to "upgrade" our point object to a point geometry object, and then set the spatial reference of that Point Geometry object. We'll also add a line to create the input spatial references, which is WGS 1984 or WKID 4326.
Add the following code to create the input spatial reference and then migrate our observation point to an ArcPy point geometry object, which can accept a spatial reference as a property. This code should appear just after you create the
obsPointobject and assign itsXandYproperties (line 88).# Convert the point to a point geometry object with spatial referenceinputSR = arcpy.SpatialReference(4326)obsPointGeom = arcpy.PointGeometry(obsPoint,inputSR)Finally, update our
insertCursorstatement to use the point geometry object instead in of the point object (line 95)cur.insertRow((obsPointGeom,tagID,obsLC,obsDate.replace(".","/") + " " + obsTime))Run the script and again verify the locations in ArcGIS. If all is good, commit to Git!
Pause and appreciate all you've done so far. We've successfully created a feature class from coordinate data buried inside a raw data file. And even dealt with projections! A few notes before we move on:
→ First is that we are assuming all the ARGOS files are in the WGS84, but we could fairly easily redesign our script so that the inputSR variable become a user input - and place the onus on the script user to be sure the inputs are using the correct spatial reference.
→ Second is where our cur.InsertRow() statement occurs relative to the try: /exept: statements. Now that our script appears to be working smoothly, we should actually move (and indent) this statement inside the try: code block. This is actually quite important because, as is, if an error did occur in translating data to actual lat/long coordinates, the insertCursor() statement would still run, but with the previous record's coordinate values! Oops!
Move the
curInsertRow()statment (and surrounding lines - lines 94-96 ) into the endtry:code block (to lines 90-92) and indent them.Delete the lines that prints values for each record
♦ Cleanup & Final Touches
7. Iterating through all ARGOS data files
Almost there! Our final task is to combine all we've done above, but instead of for a single ARGOS data file, do it for all files in a user specified folder. Like most scripting tasks, this can be done from several approaches. For example, we could create a new, second script that loops through each document in a folder and then calls the script we just completed. However, the most straightforward approach may simply be to adjust our current script a bit so that it: (1) Reads in a user folder rather than a user specified ARGOS data file; (2) Creates a list of ARGOS data files within that folder, and (3) Runs our existing code within a for loop. Let's take that approach.
First, replace the line where the
inputFilevariable is set to a specific file (line 18) with a new line that sets a variable calledinputFolderto the relative path value of the folder containing all the files:inputFolder = '../Data/ARGOSData'Directly below that, add code to use the
os.listdir()function to create a list of files in that folder:inputFiles = os.listdir(inputFolder)If you run these two lines in the interactive window and then print the contents of the
inputFilesvariable, you'll see it indeed prints a list of all the files in the folder. You'd also see that one file, theREADME.txtis not a file we want to include in our analysis. By now, you should know enough Python how to iterate all your code for each file, except the README.txt file, but in case not, the full code is provided here: Code link. The final feature class should have 49,188 features.
8. Linking our tool with ArcGIS
Lastly, we'll remove our hard-coded inputs, replacing them with script inputs (using arcpy.GetParameterAsText()), and add some messages to be sent to the ArcGIS progress window.
Change the input variables to allow user inputs at run time for the
inputFolder,outputFC, andoutputSR:# Set input variables (user input)inputFolder = arcpy.GetParameterAsText(0)inputFiles = os.listdir(inputFolder)outputFC = arcpy.GetParameterAsText(1)outputSR = arcpy.GetParameterAsText(2)In the
Exceptioncode block, change theprint()statement toarcpy.AddWarning(). Add other messages/warnings/errors as you see fit.Save and close your Python script and open ArcGIS Pro.
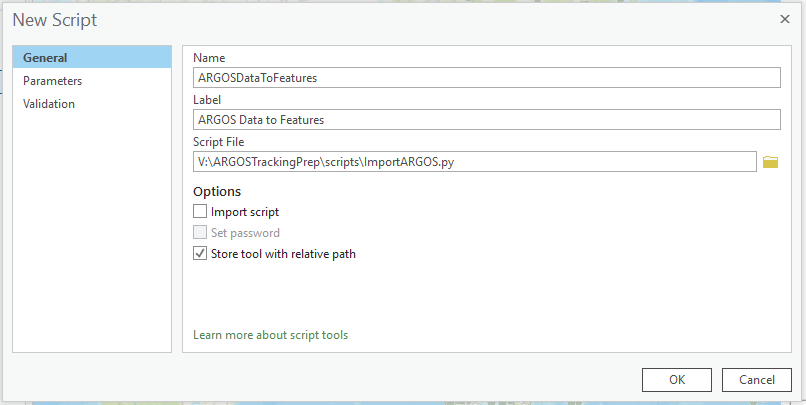
Create a new script tool in your project's toolbox:
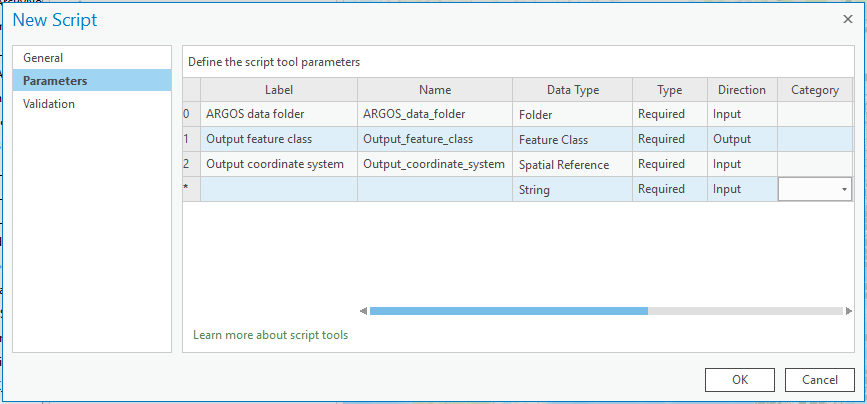
Set the scripts parameters:
Run the tool. Does it work?
Where to go from here?
Now that we have a working script, we can enhance our script with more functionality. I've provided a final script HERE that allows the user to specify a set of Location Classes that can be used to filter which ARGOS observations are included in the output. Turns out that all the records with improper coordinate information have a Location Class of "Z", so if we filter those out we really cut down on errors.
Some other enhancements we could potentially include would be to, instead of drawing observation points, actually draw a line connecting the tracks for a given tag ID. Or we could add some code that intelligently decides when to use the alternative coordinates within a track observation by measuring each point's distance from that of the previous observation point and use the nearest coordinate of the pair.
The options are limitless, but the moral of this story is that a scripting project can be much easier to accomplish when broken into simpler steps and build gradually. You should also have noted that keeping your script organized and well commented makes debugging, enhancing, and re-using scripts much easier. Finally, while scripting can have its frustrating moments, it has its rewards in seeing the computer do all your work for you and saving you gobs of time.