Getting Started With PythonWin
Getting Started With PythonWin♦ Integrated Development Environments (IDEs)Which IDE to use? ♦ Installing PythonWin -- Oh, and Python Environments, Conda, and PipPython EnvironmentsIntroducing Conda & cloning your ArcGIS Pro environment. Installing PythonWinCreating a shortcut to PythonWin♦ Navigating PythonWin♦ Debugging scripts with PythonWin♦ What’s next♦ A quick peek at Spyder► Installing Spyder►Using Spyder
♦ Integrated Development Environments (IDEs)
Python scripts are simply text files with a .py extension; you can open them and read them, even write them, in Notepad, Wordpad, Notepad++, etc. However, working with Python scripts is more easily done in an integrated development environment (IDE) as these IDEs offer tools to auto format scripts as you write them, to debug them, and even to execute Python statements or chunks of scripts interactively.
Which IDE to use?
Several IDEs exist for Python. IDLE is packaged with Python and is the default one if you chose to edit a script tool from within ArcMap. The benefit of IDLE over many other Python IDEs is that it is cross platform, meaning it can be run on Windows as well as Linux machines. Beyond that, however, it's not that great. In fact, I don't know anyone who uses that.
PythonWin (aka "pywin32") was recommended by ESRI for those writing Python scripts on Windows machines since ESRI adopted Python as its scripting language in the early 2000s. It's a little dated now, but is still reliable and is what we'll use today. Other popular IDEs include Spyder, which works well with ArcGIS Pro, PyCharm, and Rodeo - for those who like an R-studio like interface. Installation can be tricky, however, and as the old adage goes: your mileage may vary.
For simplicity sake then, we'll stick with PythonWin, but time permitting, we'll take a quick glance at Spyder
♦ Installing PythonWin -- Oh, and Python Environments, Conda, and Pip
PythonWin is a free software package that has to be installed separately from ArcGIS. A version of PythonWin that works with ArcGIS Desktop is installed on the NSOE machines, but PythonWin is linked to a specific installation of Python and thus this version only works with Python 2.x. We'll want to have a version that works with 3.x/ArcGIS Pro, so we'll take this opportunity to introduce the world of Python environments, packages, and package managers.
Python Environments
While ArcGIS Pro installs a single version of Python 3.x, we can create many separate Python environments in which to work. You can think of a Python environment as a virtual copy of the software. We may need separate environments because the various add-on packages we may want to install might conflict with each other. It's just a side effect of using 3rd party packages developed independently, but allowing for multiple programming environments is a nice workaround for this.
ArcGIS Pro comes with a locked base environment, but we can clone this environment and make changes:
♦ Exercise 1: Viewing ArcGIS's Python Environments
- Open ArcGIS Pro, but don't open a project; Instead, click on the
About ArcGIS Proopen in the lower left corner.- Select
Pythonfrom the left hand menu in the About ArcGIS Pro window. This opens the Python Package Manager- Click on
Manage Environments. There you'll see the default Python environment:arcgispro-py3.- You could click
clonenext to the environment to duplicate it, but we're going to do that a different way. This is because the Python Package Manager is still a bit unstable and unpredictable.
Introducing Conda & cloning your ArcGIS Pro environment.
Conda is a Python package manager, similar to ArcGIS Pro's package manage. Conda has a command line interface (boo!), BUT it's currently a bit more stable (yeah!) - and it's good to know these things in case you later use Python without ArcGIS. (Read more about Conda and ArcGIS here)
♦ Exercise 2: Cloning ArcGIS's Python Environments using Conda
Open up the Python Command Prompt, found within the ArcGIS section in your Windows menu.
When the prompt box opens, notice the
(arcgispro-py3)in the prompt text. This is because this prompt is set to work in ArcGIS Pro's default environment ... for now.List all the environments installed on your machine:
conda info --envs.Now create a clone of your arcgispro-py3 environment, naming it my_env:
conda create --clone arcgispro-py3 --name my_envNote: this may take a few moments to completeTo make this the active environment type:
activate my_env. Note that the prompt changes to reflect your active environment.Again, type
conda info --envsto list the available environments and see that your new one is now listed. Also note that it shows where the environment is located.Open ArcGIS Pro, navigate to the Python Package Manager, click the Manage Environments button and see that your new environment is listed there. Click the radio button next to it to make it the default environment.
For more information on Conda commands see: https://conda.io/docs/user-guide/getting-started.html
Installing PythonWin
Now that we have our own personal python environment, we can make whatever changes we want with it. If we run into issues, we can destroy it (conda remove --all --name my_env) and recreate a new one. For now, we'll modify it by installing PythonWin, and this is done with more "conda" commands.
♦ Exercise 3: Installing PythonWin
- Open your Python command prompt again, if it's not open already.
- If your
my_envis not the active environment, activate it by typingactivate my_env.- Install PythonWin:
conda install -c anaconda pywin32. At some point, you'll be asked to confirm installation; go ahead and accept.
Creating a shortcut to PythonWin
While we just installed this package, access to it is buried deep inside your Python environment. To make it easer to use, we'll create a shortcut to the PythonWin app.
♦ Exercise 4: Creating a shortcut to Pythonwin
- Right click anywhere on your desktop and select
New>Shortcut.- For the location of the shortcut, use:
%localappdata%\ESRI\conda\envs\my_env\Lib\site-packages\pythonwin\Pythonwin.exe- Click
Next, give your shortcut a name, then clickFinish.- After your shortcut is created, right click on its icon and select
Properties.- In the properties window, clear out the contents of the "Start in:" box.
You can now copy this shortcut any where on your local or virtual machine and it will open up PythonWin, setting the folder in which the shortcut lives as the default workspace.
Ok, if we all survived that, let's take a quite tour of PythonWin!
♦ Navigating PythonWin
Create a new folder somewhere on your machine and copy the PythonWin shortcut to that folder.
Open PythonWin
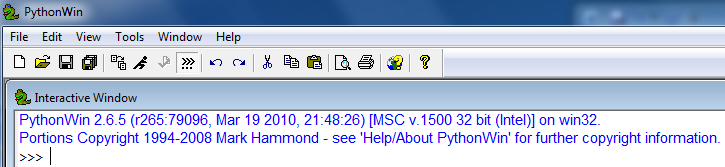
When PythonWin opens you are presented with the program’s menu and tool bar as well as the interactive window. The interactive window allows you to type Python commands and execute them. These commands are typed at the prompt (where you see
>>>).
Run a Python command from the prompt in the interactive window
Type the following at the Python prompt and then hit
Enter.
Now hold the control key and click on the up arrow key on your keyboard. You’ll see the previous command you just typed appear at the prompt again. This can be very handy…
Create a new Python script
Select
Newfrom theFilemenu or click the "new" button in the toolbar. In the box that appears, selectPython Scriptand clickOK. A new Script window will appear. In this window, type the same command as you typed in the interactive window.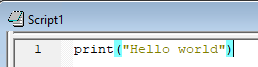
Save the python script
Select
Savefrom theFilemenu or click theSavetool in the toolbar. Save your script as "HelloWorld.py" in your folder, then close PythonWin.Open the python script in PythonWin
In Windows Explorer click the
HelloWorld.pyfile and drag it on top of the PythonWin shortcut. You should be right back to where you left off when you closed your script.Run your script
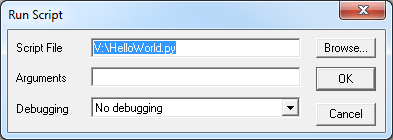
With your
HelloWorld.pyscript active, click the tool that looks like a little guy running. This runs your script and sends any output to the interactive window. However, before it runs, PythonWin asks whether you want to run your script in a debugging mode or not. For now, select the default ofNo debuggingand clickOK.
Modify your PythonWin settings
Select
Optionsfrom the View menu. In the box that appears, click the Editor tab and change Line Numbers from 0 to 30.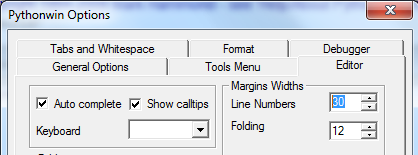
Doing this exposes line numbers in your script window. This can be very helpful as our scripts get longer and longer.
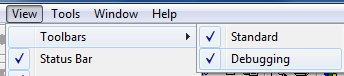
Next, in the View/Toolbars menu, select Debugging. This will add the debugging toolbar to your script. Well use this later.
Note: Like ArcGIS preferences these preferences will not be saved from machine to machine or if your local profile is deleted. However if you are on your virtual machine, everything will be fine!
You should now have a rough idea of how to create, open, edit, and run Python scripts using the PythonWin IDE. There’s much more that PythonWin can do for us, of course, and we’ll see that as the tutorial moves along, starting with the next exercise where we examine a simple case of debugging a Python script.
♦ Debugging scripts with PythonWin
Nearly every script you write will have at least one pesky error that you’ll need to fix before it will perform exactly as you want it to. Errors come in two forms: Syntax errors arise from typos or other miscues in your script that prevent Python from understanding what you are saying. Syntax errors are usually easy to spot and often easy to fix. Logical errors occur when your script runs, at least part way, but does not give you the output you expect. These can be harder to fix and may require painstaking analysis of your scripts flow and introspection of variable values at specific points along your script’s execution. Debugging is one of the more challenging aspects of writing a script, but fortunately PythonWin has several tools that allow you to identify and fix errors. In Exercise 2 we examine a simple script that has some errors in it, and we use PythonWin debugging tools to identify and fix them.
♦ Exercise 5 - Using PythonWin to debug a script
Open up the PythonWin(if its not open already). Make sure that the debugging toolbar is visible.
Create a new script, copy the code below into it, and save the script as
Exercise5.pyx
ENV 859: Exercise 5name = "Amelia"gender = "F"age = 4class = "Panda Bears"print (name + " is " + age + " years old.")print ("She is in the " + class + " class.")Before running anything, take a look at the script and you’ll see text printed in different colors and some words in bold. One advantage of using an IDE over a text editor to write scripts is an IDE’s ability to auto-format your script. For example, strings are shown in one color (beige), numbers in another (teal), and Python commands or other reserved words in a bold blue.
Next, see if you can decipher what this script does. It has four variables (name, gender, age, and class), each assigned an initial value. Then, the script issues two print statements to print the values of these variables to the interactive window.
Check the script for syntax errors. Just to the right of the Run icon in the toolbar is the "Check" tool (
 ). Click this to see whether you script has any syntax errors. You’ll get a report at the very bottom of the PythonWin window.
If a syntax error is present, PythonWin places the cursor to where it thinks the error occurs. In our case it’s the very first line.
Set the first line to be a comment. The first line in our script is not Python. It is just some text we include to identify what the script does, and so we want Python to just ignore it. To do so, place a pound sign in front of it. You’ll see that the text turns green, part of PythonWin’s auto-formatting for a comment.

Check the syntax again. You'll now see that there's a syntax error in Line 6. The problem here is that we have used a reserved word ("class") as a variable name. We know this because "class" is in bold blue.
Change the
classvariable name in line 6 toclass_name
Update the reference to the
classvariable in line 9 to the revised variable nameclass_name.
Check the syntax again. You should have no more syntax errors as shown by the following message at the bottom of the PythonWin application window:

Run your script. Go ahead and try running your script using the Run button (with no debugging). You will get an error message in the interactive window.

In this case, the error message states the error occurs in line 8. Some error messages are not as kind and don't reveal exactly where the error occurs. For this we need debugging tools.
Step through your script. In the debugging toolbar are three tools that allow you to step through your script a line at a time.

Check variable values during run time. In the interactive window, you can run Python statements that include the variables that have been assigned from running your scripts. Try the following:

In line 5, put quotations marks around the value assigned to the
agevariable.
Run the model again. It should work, and print out the following to the Interactive window.

Close PythonWin. Notice you didn’t need to save your script. It is saved each time you run your script.
♦ What’s next
After completing this tutorial, you should now be able to know enough about Python and PythonWin to do some experimentation on your own with creating variables of different data types and performing operations on them. Next up, we focus more on writing scripts using these objects and their functions.
♦ A quick peek at Spyder
► Installing Spyder
- Open ArcGIS Pro, and navigate to the Python Package Manager
- Click on the
Manage Environmentsbutton and change the default environment to your "my_env" environment we created earlier. - Back in the Python Package Manager, Click
Add Packages, and then typespyderin the Search bar. - Select the one that just says
Spyderand click Install. Accept all defaults to install it on your environment. - In Windows Explorer, navigate to your environment's "Scripts" folder:
%localappdata%\ESRI\conda\envs\my_env\scripts - There, you'll see a file called
spyder.exe(or sometimesspyder3.exe). Make a shortcut of this file in your Python (or any other) folder. This will open the Spyder IDE.
►Using Spyder
- Paste the demo code use to tinker with PythonWin into Spyder's Editor window. Tinker around with it. Which do you like better on first impressions??