Quick Start to Google Earth Engine
Google Earth Engine (GEE) is an amazing data resource and analytical platform. With a free account, Google provides access to petabytes of remotely sensed, climate, geophysical, demographic, and other datasets - datasets that would take significant person-hours to download, georeference, and atmospherically correct if you were to do this on your own. Instead, these datasets are fairly easily queried as single image bands, multi-image bands, and even derived datasets such as NDVI and multi-date composites that allow for cloud-free or other filtered data products.
→ Explore and browse GEE’s data catalog: https://developers.google.com/earth-engine/datasets
But equally amazing is that GEE allows you to analyze these data sources (as well as data you upload to your GEE account) using Google’s high speed cloud computing platform.
To gain access to this astonishing resource, you first need to apply for a free account. And then you need to understand how to use it. The purpose of this tutorial is to get you past starting from scratch so that you can start your journey to using GEE a bit more quickly, though some additional work will be required before you might feel competent.
In 2019, the Advanced GIS class was lucky to have MEM Taylor Minich, who attended “Google Earth Engine camp” the previous summer provide a demo on how to use it. A bit below, I provide a link to a recording of Taylor’s video, but before we get to that, let;’s ensure we have what we need to plunge in.
Lesson prep:
1. Sign up for a free account to use Google Earth Engine.
- If you don’t already have a Google account, create one.
- Navigate to https://signup.earthengine.google.com and sign up using your Google account
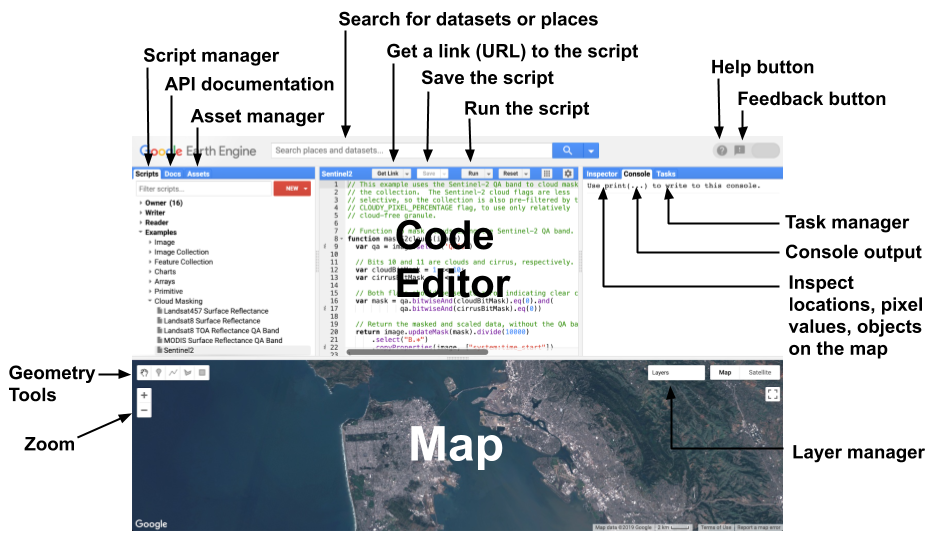
2. Familiarize yourself with Google’s EE JavaScript Code Editor
Taylor will discuss these in more detail, but it will be useful to at least open these pages and familiarize yourself with their overall structure.
- Documentation: https://developers.google.com/earth-engine/playground
- Tutorials: https://developers.google.com/earth-engine/tutorials/tutorials
- Includes a primer on JavaScript here!
- The code editor itself: https://code.earthengine.google.com/
- The interface:
3. Access Taylor’s demo
-
Use this link to clone Taylor’s demo material to your GEE account:
https://code.earthengine.google.com/?accept_repo=users/taylorminich/advgis -
Link to video here (note, we had some tech issues at the start of class, so you should forward to the 8:30 mark)
Additional Examples
- Connect to Examples repository:
- Create your own repository:
New>Repository - Yes these are Git repositories! (Stored on Google’s server, not GitHub.com)
Creating a Python Environment to Run GEE’s Python API
Google Earth Engine is primarily a JavaScript product, but Google does provide an partially support a Python API. Unfortunately, documentation for this API is lacking, especially compared to the JavaScript documentation.
-
Create a new Conda environment, and install the earth engine API and Jupyter packages
conda create --name gee activate gee conda install -c conda-forge earthengine-api consta install jupyter -
Create a new workspace and a shortcut to the new environment’s Jupyter executable.
-
Create a new notebook and use the following code to Authenticate:
import ee
ee.Authenticate()
This will open a new page asking you to log into your Google Account. When you log in, you’ll receive a token which you pasted back into your notebook. (It’ll be obvious where…) This saves a credential on your current machine so you only have to do this once – for that machine. If you switch machines, you’ll have to authenticate that machine.
-
From there running
ee.Initialize()gives you access to Google Earth Engine via Python!
I have a few [old] demos that implement the API. You can fork and clone my repository located here:
https://github.com/DataDevils/ee_demo