Python 101 - Navigating Jupyter Notebooks
Introduction
There are many places to write and execute Python code. For now, we’re just going to select one and later come back to explore other options. We are going to use Jupyter Notebooks and perhaps it alternative form Jupyter Lab. We’ll cover the advantages (and limitations) of Jupyter Notebooks as we go, but for now, let’s dig in to the basics on how they are used.
Topics & Learning Objectives:
| Topic | On completion, you should be able to… |
|---|---|
| 1. Starting Jupyter Notebooks | Describe what a Jupyter notebook is Prepare for a Jupyter notebook session Start a Jupyter Notebooks in a specific folder via command line Create a shortcut to open Jupyter Notebooks in a specific folder |
| 2. Navigating Jupyter Notebooks | Explain the components of the Jupyter Dashboard Create, open, rename, and delete, Jupyter Notebook documents Explain what kernels are and how they are used Properly close a notebook document Properly close a notebook session |
| 3. Crafting notebook documents | Add cells to notebook documents Write and execute code in a notebook’s code cell Write and format text in a notebook’s markdown cell Save and export documents in alternative formats Properly close a Jupyter session |
| ♦ Exercises |
1. Starting Jupyter Notebooks 
What is a Jupyter Notebook?
A Jupyter Notebook is a blend of formatted text and live code. Those of you who have worked with R-Markdown files are familiar with this concept. They are an incredibly powerful yet simple means for sharing your work in a way that reveals both your results, sometimes as interactive visualizations, but also the exact code used to produce these results. They are a cornerstone in efforts to promote reproducible research.
As we’ll see soon enough, a standard Python file is simply a text file containing only Python code (and comments), and has a .py extension. Jupyter Notebooks, which can actually contain R and Julia code in place of Python code, have a .ipynb extension. You can open them in a text editor, but they are really only suited for opening in the Jupyter Notebooks application.
Anyway, we are going to start our session by creating a folder in which we’ll store our Jupyter Notebook files and then learning how start the Jupyter Notebook application within these folder. This process is less straightforward than it should be, but it’s easy to learn.
Starting a new Jupyter Notebook session in a particular location
While there are multiple ways to open a Jupyter Notebook session, we’ll use one that allows us to open a session in a specific location.
-
Create a new folder called “Notebooks” on your personal class drive, e.g.
V:\Notebooks. -
From your Windows Start menu, select ArcGIS > Python Command Prompt.
-
At the prompt, navigate to a location where you want to save your notebook files. For example, type
V:to navigate to your V: drive. Then typecd Notebooksto enter into your Notebooks folder in your V: drive. -
Then type
jupyter notebookto start the new session.
► If all goes well, you’ll see the Jupyter Dashboard appear in your default web browser. We’ll get back to the dashboard shortly.
-
For now, close your Jupyter session by clicking the
Quitbutton. You should get your prompt back in the Python command window, and a message should appear in your browser that you can close the web page that hosted your Jupyter notebook session.
Creating a Windows shortcut to open Jupyter in a particular location
To make things easier, we’ll create a shortcut file that we can just double click to open Jupyter in a specific location.
-
In Windows explorer, navigate into your new
Notebooksfolder. -
Right click anywhere in this folder and select
New>Shortcut. -
Where it asks to “Type the location of the item”, copy and paste the following (including the quotes):
"C:\Program Files\ArcGIS\Pro\bin\Python\envs\arcgispro-py3\Scripts\jupyter-nbclassic.exe"(This is the location where ArcGIS Pro installs it’s default copy of Jupyter notebooks – in “classic” format, to match the recordings)
-
Give the shortcut a name, e.g.
Juptyer-Notebook -
Now right-click the shortcut you just created and open its properties.
-
With the
Shortcuttab selected in the properties window, change the contents of theStart in:to “%cd%”. This will cause Jupyter to point to the same directory as the shortcut file itself when it is run.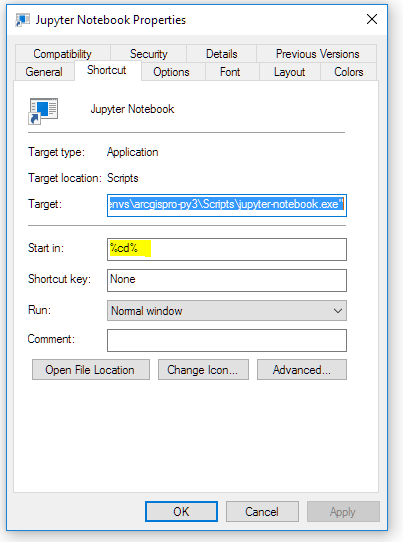
-
Close the properties and double click the shortcut. Jupyter should open pointing to the path where the shortcut lives. You may also notice a black DOS window opens as well. Don't close this window as it’s part of your running Jupyter session.
 You can now copy this shortcut to any folder and Jupyter should open in that folder.
 -
To close your Jupyter Notebooks session, click the
Quitbutton. This should close the black log window, and a message should appear in your browser that you can close the web page that hosted your Jupyter notebook session.
2. Navigating Jupyter Notebooks
When you first open Jupyter you see your Jupyter Notebook Dashboard. This is where you control the various notebook and other files. At present we have none, but you can see the shortcut file you just created. We’ll run through a few exercises to familiarize yourself with these operations.
If you want more information on what we cover, these are some good resources:
To start, we’ll download some example notebooks and fire up Jupyter notebooks:
- Download and unpack this JupyterExamples.zip file into the
Notebooksfolder you created above. - Open a Jupyter Notebooks session in your
Notebooksfolder (either by command line or via the shortcut).
2a. Opening and closing Jupyter notebooks
To open and [properly] close an existing Jupyter notebook:
-
You should see the
JupyterExamplesfolder you unzipped in your Jupyter Dashboard. Click it to navigate into it. -
Click once on the
python-matplotlib.ipynbentry; this will open that notebook in a new browser tab. When a document is first opened, a new “kernel” is started for that notebook. This kernel remains open until you explicitly shut it down.What is a “kernel”?
A kernel can be thought of as the processing engine associated with a specific Jupyter notebook. An active kernel uses computer memory to store the state of all processes run in your notebook, e.g. the variables of all assigned variables. If you save a notebook then just close the web page, the kernel stays active. This might be nice as you can simply re-open the page and resume your work (sometimes, that is, I don’t recommend this!), but it also keeps the computer memory occupied. Shutting down the kernel releases the memory.
Hitting the Running tab on your Jupyter dashboard reveals all running kernels, allowing you to shut them down from there.
You can also interrupt and/or restart kernels from within your notebooks, useful when you mistakenly start a long process or otherwise hang your notebook, or when you just want a clean start.
Lastly, when we created our notebook, we selected a Python 3 kernel. However, you can install other kernel types to work in Jupyter, including other versions of Python as well as kernels that run R code.
-
From the
Cellmenu, selectRun All. This will execute all the code in the notebook and you’ll see some nifty plots. -
Close the
python-matplotlibtab in your browser and navigate back to your Jupyter dashboard page. You’ll see that thepython-matplotlib.ipynbentry is still green, this indicates its kernel is still active. (If it’s not, try refreshing your page.) -
Open the
python-matplotlib.ipynbnotebook page again by clicking on the entry in the Jupyter Console. -
To shut it down properly, select
File>Close and Halt. (Alternatively, from the Jupyter dashboard, you can check the box next to the notebook entry and then clickShutdown.)
2b. Creating and [re]naming new Jupyter notebooks
To create and name a new Jupyter notebook:
-
From your dashboard, select
New▼>Python3to create and open a new notebook using the Python (v3) kernel. -
Under the
Filemenu, selectRenameand name your notebook “My-First-Notebook”. (Alternatively, you can just click the name just to the right of the Jupyter logo to rename a file…) -
Toggle back to the dashboard web page and see that your document appears.
🤔 Is the document in green or black? Why?
2c. Kernel operations: interrupting & restarting the kernel
-
Add a new code cell to your notebook, and enter the following command.
while 3 > 2: print('.',end='-')Don’t worry about what this code means other than it is an infinite loop: it will continue printing “.-“ until three is less than or equal to 2 (i.e. never).
-
Run the command. Your code will continue to print until you stop it.
-
From the Kernel menu in your notebook, select Interrupt. This will halt the code execution, giving you control again.
-
Now, from the Kernel menu, select Restart & Clear Output. Can you guess what this does?
3. Crafting notebook documents
Recall that the advantage of a notebook document is the ability to combine live code with formatted text. Here, we’ll look into how a notebook is crafted to do just that.
3a. Code cells
Jupyter notebooks are organized into cells. By default a cell is designated as a code cell, i.e., one that accepts and runs Python code (or code associated with whichever kernel is driving the page).
-
Back in your new notebook, in the first cell, type:
x = 10 -
To execute this command, either hit the “run cell” button (
►|) button, or pressalt-enter, or pressctrl-enter. -
Unless you chose
ctrl-enter, a new code cell appeared below. To add a new code cell manually, hit the ➕ button. You’ll also see that to the left of the code cell theIn []changed toIn [1]. That “1” indicates both that the code in that cell has been run and in what sequence it has been run. -
In the new, empty code cell, type:
print(x) -
Run the code in that cell. Does everything make sense? Ask if you have any questions.
3b. Restarting the kernel
If your program hangs or if you want to reset everything, you can restart the notebook’s kernel. This wipes all variables from the kernel’s memory and starts everything as if you just typed but never ran any of the cells.
- From the
Kernelmenu, selectRestart & Clear Output - Re-run your two code cells. Or just select
Run Allfrom theCellsmenu.
3c. Markdown cells
Of course, one of the great benefits of these notebooks is that they are not all code. We can add formatted text using “markdown” language. The formatted text, however, have to be in a separate cell, one that we specify as a Markdown cell:
- Add a new cell to your notebook by hitting the
insert cellbutton (➕). - Change the cell type from
CodetoMarkdownusing the dropdown menu - Add a bold markdown statement:
## Big textand then “run” the cell as you did with the code cell above. - Add a new markdown cell with the text:
$E=mc^2$and run it. -
To change the markdown text, double click the cell and it reverts back to “edit” mode…
More on markdown is here. Or open up the
Working With Markdown Cellsnotebook.
3d. Sharing your work and ending your session
- Save your document by clicking the
 icon.
icon. - You can now share the
.ipynbfile stored in your Notebook folder with others, but you have other options. - From the
Filemenu, select theDownload asoption and you’ll see the export options. Play with these. Some are more intuitive than others, but most often you’ll either want to keep your document as a notebook file or export as an html document. - When you are all done, and have saved your documents, you can again click the
Quitbutton to close gracefully. Alternatively, you could close your browser window, but this still leaves the Jupyter application running until you either close the black log window or hitctrl-cuntil it closes or the prompt returns.
Ok, that introduces the very basics of Jupyter notebooks, enough to get you out of the gates. There’s certainly much more to learn, and you should certainly browse more documentation, explore, and experiment! And we’ll continue to learn other nifty Jupyter tricks as we learn more Python.
And now, we are [finally] ready to dive into Python!
♦ Exercises…
Explore Jupyter notebooks! Here are a few exercises to get you started, but I fully encourage you to play around until you get more comfortable creating and moving files in the Jupyter environment.
- Create a new Jupyter notebook and rename it “
My-second-notebook.ipynb”. - Add a markdown cell that has some formatting.
- See if you can make a copy of the notebook, naming the copy “My-first-copy”
- Stop the kernel of the original notebook, but keep the copy’s kernel running.
- Create a new folder and rename it “
MyFolder” - Upload a the ExampleNotebook.ipynb found here and try to run it…
- Delete the “MyFolder” folder you just created and its contents.