Problem Set 4 - GIS in Python
| Task | Description |
|---|---|
| Set up | Fetching the data for the exercise, instructions, & tips |
| Task 1 | Using geoprocessing tools in Python |
| Task 2 | Using geoprocessing tools in a loop |
| Task 3 | Using ArcPy functions, classes, and geoprocessing tools |
| Task 4 | Describing data in ArcPy; Creating script tools in ArcGIS Pro |
| Task 5 | Working with ArcPy geometry objects |
| Submission | Submitting your assignment |
Set up
The following tasks refer to data in the zip file “ENV859_PS4.zip”, available here. This zip file should be uncompressed to your V: drive to create a V:\ENV859_PS4 workspace. This workspace contains the familiar Data, Scripts, Scratch, and Docs folders. Within the Data folder are the datasets needed to do the assignment. Save all scripts in the `Scripts` folder and write your code to send output files to the *scratch* folder unless otherwise specified.
When writing scripts in this exercise, there’s no need to include extensive front matter (e.g., the script name, description, name, date, etc.), but it may be helpful to add comments that briefly describe each step in your script so that we can offer partial credit.
When you’ve completed this assignment, compress your entire workspace folder into a single zip file, being sure to include any requested screen captures in your Docs folder. Rename the zip file using your NetID followed by “_PS4” (e.g. jpfay_PS4.zip), and submit it via the Assignments section on Canvas.
Some general tips to contemplate as you tackle this assignment:
Use intuitive names for your variables, and use lots of variables.
If you comment out lines for debugging, clean them up before submitting your final scripts.
The construction of a compound if statement requires fully written tests for all conditions.
- Incorrect:
If x == "something" or "another thing"- Correct:
If x == "something" or x == "another thing"For multiple tests in an if statement, consider when and where to use parentheses. The following yield different results!
if (x>1 or x<10 and x!=4)vsif (x>1 or x<10) and (x!=4)vsif (x>1) or (x<10 and x!=4)Logic - thinking through the different results from
and,or,==,!=:
if x != "A" or x != "B"→ when x is “C” how does this test evaluate? What if x is “A”?if x != "A" and x!= "B"→ when x is “C” how does this test evaluate? What if x is “A”?
Task 1
Task 1 is a sequence of steps that lead you toward building an interactive Python scripts that implements the ArcGIS’s Buffer tool. Each step is used as a building block to the next step.
References:
- http://pro.arcgis.com/en/pro-app/arcpy/get-started/setting-paths-to-data.htm
- http://pro.arcgis.com/en/pro-app/arcpy/geoprocessing_and_python/using-tools-in-python.htm
- http://pro.arcgis.com/en/pro-app/arcpy/geoprocessing_and_python/using-environment-settings.htm
1a. (5 pts.) Creating the initial buffer script
Write a Python script (Task1a.py) in your Scripts folder that buffers the Streams.shp feature class 1000 meters, writing the output to a new feature class called StrmBuff1km.shp located in the Scratch folder. Include in this script statements that do the following:
-
Creates a string variable that includes the path to the
streams.shpfeature class -
Creates a second string variable that specifies the buffer distance as “1000 meters”
-
Creates a third string variable that sets the path and filename of where the buffer tool should write its output. This should be a file named
StrmBuff1km.shplocated in the Scratch folder. -
Executes the buffer command such that the streams are buffered set buffer distance, in planar (not geodesic) terms, on both sides (the default), with a round end type (the default), and dissolved into a single feature (not the default).
-
At the end of your script, add the following line to display any messages, warnings, or errors to your Python interactive console:
print(arcpy.GetMessages())
NOTE: All inputs and output data references can be ‘hard-coded’ (meaning full pathnames can be typed in the code itself, not passed as user input variables).
1b. (3 pts.) Setting environment values in your script
Copy (or “Save as…”) the above script to a new file (Task1b.py) and modify it so that it includes the ArcPy environment settings that:
- Sets the ArcPy workspace environment to the
Datafolder in theENV859_PS4folder; - Allows script outputs to be overwritten.
Also, since the workspace environment variable has been set to the data folder, you should also be able to just specify the stream feature class file name in the buffer tool, not the full path. Make that edit to your script, but keep the output file hard-coded to go to the scratch folder just as in the previous script.
1c. (5 pts.) Enabling user input
Copy the above script to a new file (Task1c.py) and restart your interactive session. Modify the new script so that:
- The buffer distance and the output feature class values are both specified as user input variables rather than hard wired. (e.g.
distance = sys.argv[]ordistance = arcpy.GetParameterAsText()). - The user knows to enter buffer distance input in meters such that he/she can simply enter a numeric value (e.g. “1000”). But code your script so that this number is interpreted as meters, not decimal degrees, miles, km, etc. In other words, convert the user input integer into string that reflects a “linear unit” data type: “
1000” becomes “1000 meters”.
The filename of the input stream feature class can remain static as in the previous Task2b.py script. You can assume that the user will input values without making a mistake (i.e., no need to do any error trapping).
You can also assume that the output filename supplied by the user will include the full file path, e.g. “V:\ENV859_PS4\Scratch\StrmBuff1km.shp”
launch.json” file and add a line to the “configurations” dictionary with the key of “args” and your input values as strings inside a list (e.g.,"args": ["1000", "V:/ENV859_PS4/Scratch/StrmBuff1km.shp"]). Also recall, that the script needs to be run in debug mode for the values in thelaunch.jsonfile to be read into your script.
1d. (4 pts.) Adding auto-generated output names
Copy the above script to a new file (Task1d.py) and modify it so that the user continues to input the buffer distance as above. This time, however, the output feature class will be generated by the script. (In other words, remove it as a user input in your code.)
Set the buffer output to be saved into the Scratch folder and named buff_1000m.shp, where the “1000” in the name reflects whatever the user inputs as a distance. For example, if the user input 550 as the input buffer distance, the output shapefile would be buff_550m.shp. Again, you can assume that the user will enter a valid input so that no error trapping is required.
1e. (3 pts.) Iterating through buffer distances
Copy your Task1d.py to a new script called Task1e.py and tweak it so that, instead of asking the user for a single buffer distance, it buffers the streams distances of 100, 200, 300, 400, and 500 meters, each time renaming the outputs as above, i.e., with the distance in the file names. Continue to use the ArcPy Buffer command (not the “MultipleRing Buffer” tool), and strive for efficiency in your script, meaning avoid simply copying and pasting the Buffer command 5 times in your code. (Really this tweak should take very view edits to your previous script…)
Task 2
(20 pts) The data folder in the workspace provided contains a feature class of roads (roads.shp). In this exercise you will write a script that iterates through a set of road type codes, and for each code, extracts the road features having that code and writes them to a new output file using the Select_analysis tool.
The catch here is that the list of road types to process is supplied as a “multi-value string” (see link below). Thus, you need to parse this string into a list of road code items before you can iterate through them.
The following steps will guide you through the workflow, though you may want to construct (and debug) your script incrementally and not necessarily in the order described below.
References:
- http://pro.arcgis.com/en/pro-app/arcpy/get-started/working-with-multivalue-inputs.htm
- http://pro.arcgis.com/en/pro-app/tool-reference/analysis/select.htm
► Write a script (Task2.py) that:
- Enables any existing ArcPy outputs to be overwritten
- Creates a string variable containing the path to the
Roads.shpfeature class. - Simulates a ‘multi-value input’ by creating a string variable with the value “
0;201;203” (i.e. a “multi-value string”) of the road type class values to be processed. - Creates a list variable by splitting the values between the semi-colons in the string created above so the three values each become an item in the list.
- Loops through each item (i.e. each road type value) in this list, and in each iteration:
- Selects features in the
roads.shpfeature class with theROAD_TYPEattribute matching the value in the list, writing these selected features to a new, separate feature class, ideally with the “road type” value in the name, in theScratchfolder.
(For example, the first iteration will select roads with aROAD_TYPE= 0 and write them to a new file called “roads_0.shp”.) - Prints geoprocessing messages to the console (e.g. with
arcpy.GetMessages()- see the last step in1a.)
- Selects features in the
Use a ‘for’ loop to accomplish this, and ensure that each result produces a unique output (i.e. so that three distinct shapefiles are created). All outputs should be written to the Scratch folder.
Scratchfolder…
🎖️CHALLENGE - 0 pts (bragging rights)
For full credit, use thePathobject (from thepathlibpackage) to allow your code to use relative paths. Be sure, however, to convert these Path objects to strings before using them in any ArcPy geoprocessing tool. You will not lose any points by not doing this, but you will lose “bragging rights”.
Task 3
(20 Pts) For this task we want to split a point feature class into new, separate feature classes based on the polygons in which they fall. The point features are benthic monitoring sites (BMR) scattered around the Triangle region, and we want to split these features up so we have a separate feature class for Durham, Orange, Wake, Raleigh, and Chatham counties containing the BMR sites found in each. ArcGIS Pro’s Split tool is well suited to this. To further complicate matters though, we have not one, but five different BMR feature classes, one for each site ranking (Excellent, Good, Good-Fair, Fair, and Poor), and we want to process each of these. We will write a Python script that will do this for us.
The data folder in the workspace provided contains a feature class of country boundaries (TriCounties.shp) and the set of Benthic Monitoring (BMR…) feature classes – one for each ranking (“excellent”, “good”, “fair”, etc.). Follow the guidelines below to develop a script that iterates through each BMR feature class, applying the Split_analysis tool to split each BMR feature class into separate files, one for each county, with the outputs stored in an output folder for each BMR source.
References:
- http://pro.arcgis.com/en/pro-app/arcpy/functions/checkproduct.htm
- http://pro.arcgis.com/en/pro-app/arcpy/functions/alphabetical-list-of-arcpy-functions.htm
- http://pro.arcgis.com/en/pro-app/tool-reference/analysis/split.htm
- http://pro.arcgis.com/en/pro-app/tool-reference/data-management/create-folder.htm
► Write a script (Task3.py) that:
-
Ensures the ArcPy product edition used is “ArcInfo “(e.g. not “ArcView “or “ArcEditor”) since the
Split_analysistool we’ll use in this analysis requires an “Advanced “license. If it is not, print a message that the proper license is not available and cease processing any more code. (Tip: See help on the ArcPyCheckProductfunction for a useful code snippet…) -
Uses the appropriate ArcPy function to create a list of all 5 feature classes that start with “BMR” in its name (
BMR_poor.shp,BMR_good.shp,BMR_fair.shp, etc.) found in theDatafolder. (Tip: You’ll need to set the workspace environment property.) -
Loops through all 5 of these “BMR” feature classes, and for each one:
-
Creates a new, uniquely named folder, ideally within the Scratch folder, to hold the multiple files generated by the Split command. (By “ideally”, I mean try to get output to go into the scratch workspace, but if you get seriously stuck on this, just move on.)
(Tip: See the CreateFolderlink provided above…) -
Uses the
Split_analysisto break the features in the current BMR feature class by county features in in theTriCountiesfeature class (usingCO_NAMEas the split field), with the output datasets going into the appropriate folder created in the previous step.
-
At the end you should have 5 new workspaces (folders) in the Scratch folder, each with up to 4 shapefiles in it representing the various BMR sites within each county. (A county feature class won’t be created if no BMR features occur within it.)
CreateFoldertool to create the workspaces. To make sure these folder names are unique when creating them within a loop, you might want to use one of following strategies:
- Either use name of the BMR file used in the current iteration of the loop, less its 4 character extension (e.g. set the folder name to
BMR_fairby taking all but the last 4 characters in the stringBMR_fair.shp)- Or, create an integer variable outside your loop, and have it increment with each iteration of the loop. Then you can append this variable to a base workspace name and each name will be unique (“WS1”, “WS2”, etc.).
🎖️CHALLENGE - 0 pts (bragging rights)
Save the result of the
CreateFolderprocess and use it as the “out_workspace” input in theSplit()process.
Task 4
In this task we will create a script tool that we will access and run via ArcGIS Pro. This tool will return properties of a user specified spatial dataset, reporting various properties to the ArcGIS Pro’s “details” windows (which appears when a geoprocessing tool is run).
References:
-
https://pro.arcgis.com/en/pro-app/arcpy/get-started/describing-data.htm
TIP: Use the describe function listed as part of the ArcPy data access (arcpy.da) library, as it returns a dictionary. Thearcpybase library also has a describe function, but it returns an arcpy object that’s much more difficult to work with. - http://pro.arcgis.com/en/pro-app/arcpy/functions/featureclass-properties.htm
- http://pro.arcgis.com/en/pro-app/arcpy/functions/raster-dataset-properties.htm
- http://pro.arcgis.com/en/pro-app/arcpy/functions/raster-band-properties.htm
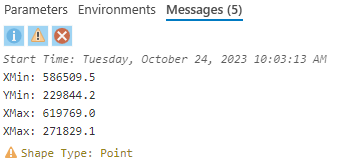
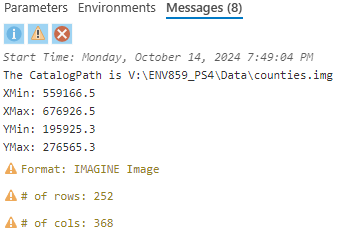
(20 pts) Write a script (Task4.py) that creates a describe object for a user-specified dataset and sends messages to the ArcGIS model window based on properties of the describe object. Unless otherwise specified, print the outputs to the ArcMap status window as a status message (as opposed to warnings or errors).
- First, have the script indicate the dataset’s
catalogPathproperty. - Second, report the
XMin,YMin,XMax, andYMaxproperties of the dataset’sextentobject.- (Challenge: round off to the nearest 10th, as shown below)
- Lastly, check the dataset’s
datasetTypeand execute the following based on what it is:- If it is a
FeatureClass, report the data set’sshapeTypeas a warning message. - If it’s a
RasterDataset, report the data set’sformat, as well as the number of rows, and the number of columns in the data set as warning messages - If it is any other type of data set, print out what data set type it is as an error message.
- If it is a
Add this script as a script tool to the PS4 toolbox in the workspace provided you. Set the one and only parameter be of the type GeoDataset and run the tool for one of the data sets in ArcPro Project. The output should resemble the figures below (first is a shapefile and the second is a raster). Your formatting may vary, but make an effort to make the result easily readable.
Result for a shapefile…
Result for a raster dataset…
Do a screen-capture of your message window (using the Snapping tool or Windows-shift-S to capture the screen). Paste the screen capture in a Word document, and save this document in your Docs folder. (Just one screen shot is needed, not one for each vector and raster…)
Task 5
References:
- http://pro.arcgis.com/en/pro-app/arcpy/classes/point.htm
- http://pro.arcgis.com/en/pro-app/arcpy/get-started/data-access-using-cursors.htm
- http://pro.arcgis.com/en/pro-app/arcpy/classes/polygon.htm
(20pts) Here we are going to write a script tool that tells the user which feature, within a user provided feature, class intersects a point we create within the script, reporting the value in the feature’s attribute table that the user provides.
I. Write a script (Script5.py) with two user inputs: a feature class and a field from that feature class. Within the script, do the following:
- Enable two inputs from the user: a feature class and a field name.
- Create a
pointobject, setting itsXandYcoordinates to be 590,000 and 230,000, respectively. - Create a
SearchCursorfrom the feature class specified in step 1, retrieving theShape@field and the field the user specifies in step 1. - Add a
forloop to iterate through each feature in the feature class one at a time (i.e. via the search cursor you just created). - Within this loop:
- Create a variable called
recShapeassign it to the value of the current feature’sShapeobject. - Determine whether the
pointcreated in the second step falls within the record’s shape:- If it does, determine the attribute value of the
fieldspecified by the user, and - Send a message back to the ArcGIS Pro indicating what the field’s value is for the record.
- If it does, determine the attribute value of the
- Create a variable called
II. Create an ArcGIS Pro script tool with this script.
- Set the first parameter to be of the type “Feature Layer”, and the second “Field”.
- Additionally for the second parameter, set its dependency to be the first parameter. (To do this, find the dependency column where you set parameters for your ArcGIS Pro script tool; from its dropdown menu, select the other parameter.) When you do this, the tool provides a list of the field names found in the feature class the user selects in the first parameter…
- Run your new script tool, using the
TriCountiesshapefile as the input feature class and theCO_NAMEfield as the field. When run, the script should loop through each of the 4 county features, determine which one contains the point, and return a message telling which county this is. - Run the script, and make a screen capture of the message window. Paste the screen capture into the same word document as used in Task 4.
Note: There’s no need to deal with any spatial reference objects in Task 5.
Submission
- Tidy up and close your ArcGIS Pro project
- Clean out your workspace (empty your scratch workspace)
- Update the Readme.txt file so it includes your name
- Double check your scripts
- Zip the entire ENV859_PS4 folder and rename the Zip folder from
ENV859_PS4.ziptoPS4_<netID>.zipreplacing<netID>with your Duke NetID. - Submit to Canvas’ Assignment section.