Intro to Git and GitHub
Introduction
Previously, we mulled our turtle tracking project objectives and devised the logical flow, i.e., the “pseudocode”, of how we might go about achieving them. Here, we begin to put that plan into action, with the first step being to create our coding workspace, a project folder that, like our ArcGIS Pro project folder, will contain all our data files (raw and generated) as well as the script files used to process these data.
Before creating that workspace, however, we are going to examine yet another set of new tools which will help us in our coding endeavors: Git and GitHub.
Briefly, these tools are used in tandem to provide robust version control for coding projects. We’ll reveal more what exactly this means as the lesson progresses, but for now, you can think of:
- GitHub as a kind of remote, cloud-based file system to which we back up and access our course workspace files, and
- Git as a locally installed application used to synchronize files between our local machine (or container) and GitHub.
This can certainly be quite confusing at first, but you’ll understand all this much better as we actually use valuable tools. And they have everything to do with creating a project workspace, also known as a repository, for our turtle tracking project.
Learning objectives
On completion of this lesson, you should be able to:
- Explain the utility of version control in coding projects
- Describe, at least in general terms, the Git versioning workflow
- Initialize your VSCode workspace as a Git-enabled workspace
- Add, stage, and commit changes to the local repository
- Authenticate your local machine to work with GitHub
- Clone a workspace to your local machine
1. Create a new project repository on GitHub
We begin by creating our Turtle Tracking repository in the cloud, hosted in our GitHub account. This repository will house all our data and coding files for the project, serving as a backup that we can access anywhere.
- Go to https://github.com and log into your account. (Create a free account if you haven’t already.)
- Create a new repository, giving it the name “TurtleTrackingProject”
- Set to Public
- Add a README file
- Accept all other defaults
This repository now has a home in your very own GitHub cloud. Take note of the web address.
2. Install and link Git to your GitHub account
While our repository of files lives safely in the GitHub’s cloud, we’ll need copies of these files on our local machine to work with them. The Git application handles the transfer of files to and from GitHub and our local machine, but for Git to work, we’ll have to install the software (if not already installed) and then configure it so that it knows who we are, and then authorize it to be able to write files to our remote GitHub repository.
Checking whether Git is already installed
-
Open VS Code and within VS Code open a new terminal (
View>Terminal). -
At the terminal prompt, type
git --versionIf Git is installed, you’ll see a reply like
git version 2.50.1.windows.1.
Installing Git (if needed)
If Git is not installed, you’ll get some sort of error message and you’ll need to install it.
- Go to https://git-scm.com/downloads/win and download the latest version.
-
Accept all defaults when installing.
- After completion, test it with the above command again.
Linking Git to your user account
For this step, you’ll need to know your GitHub username and the email you used when creating your account.
-
At the terminal, type the following (replacing
<your GitHub username>).git config --global user.name "<your GitHub username>" -
Again at the terminal, type the following, repacing
<your GitHub email>with your email…)git config --global user.email "<your GitHub email>"
Ok, now your local machine has stored these values in your local filesystem. There is an additional step of authenticating our account, but that will happen in the next step.
3. Cloning your repository
-
From the VS Code Action Menu (vertically arranged icons on the left side), find and click the Source Control button.
-
Click “Clone Repository”
-
At the top, where VS Code is expecting a URL, select Clone from GitHub
-
As you haven’t authenticated yet, this is where you’ll need to allow Git access to your GitHub account.
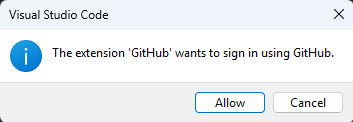
-
Click Allow to bring up the GitHub sign-in page. On successful log in to GitHub, your browser will bounce you back to VS Code, which is now authenticated. Your GitHub credentials are securely stored as an encrypted object in your local filesystem.
-
You should now see your GitHub Turtle Tracking repository listed in the dropdown list in VS Code. Select it and set where on your local machine the folder should be stored.
You now have a version controlled folder on your local machine that is linked to your remote GitHub repository.
4. Setting up our local workspace
- Edit the
README.mdfile - Add a
datafolder, with arawsubfolder. - Download the
sara.txtto thedata/rawfolder. - Add a metadata file to the
data/rawfolder - Create a new python file:
TurtleTracker.py
5. Register our new files to our local Git repository
We’ve just created a number of new files in our versioned workspace. Git is aware of these files, but won’t track changes in these files until we tell it to. To track them, we “commit” them to the local repository.
-
Open up the Source Control view in VS Code
-
You’ll see the new files listed there with a “U” next to them and one with an “M”. The “U” means the files are untracked, and the M means a modified file.
-
Press the + next to the modified
README.mdfile. This moves the file to the staging area.➡️ Files in the the staging are will all be committed as one bundle.
-
Just above the Commit button, type the phrase ‘Initial commit of README.md file’
-
Click the Commit button.
➡️ The
README.mdfile has now been added to the Git tracking system. Git’s database now has an entry for the commit stamped with the time, the message we provided, and the action taken (the file was added). -
Do the same for the
Sara.txtfile, its metadata companion, and theTurtleTracker.pyfile.- Add each to the staging area
- Once the three are added to the staging area, write a commit message: “Add data and initial script file”
- Commit the change
You’ve just experience the Git workflow. We can roll back changes if we want, but we’ll get to that later.
6. Push changes to GitHub
- Hi
Sync Changes - View repository on GitHub
So what just happened?
We now have a version controlled repository on our local machine with three files committed to it.
Soon, we will be adding new files to our coding workspace and editing them: script files, perhaps more raw data files, processed data files, etc. Each time we add a file or make changes to existing ones and we want to ensure those additions/edits never get lost, we stage them and commit them to our local Git repository, adding a message that allows us (“our future selves”) to identify what we did when so that if we want to either undo old changes or wipe all changes back to a certain point, we can do that. So now we can boldly write code without having to save files as “Change1.py”, “ImprovedChange1.py”, “FixedImprovedChanges1.py”. Instead, we’ll just have our working Python script, but one where we can revert back to various versions.
Not only are all these changes recorded and saved in our local Git repository, they are also replicated in the cloud, on GitHub.com. This has several uses. First, having our work on the cloud means we can pull our repository to any machine with the proper software installed and continue working. If our local hard drive dies, we will have a backup! But also, hosting our code on GitHub.com allows others to view our work (if we want), which is a cornerstone of the open source school of coding.
What now?
There’s still a bit to learn about what Git and GitHub are and how they are used. However, now that we’ve had some exposure, I’m hopeful the concepts will settle in more quickly. Let’s now step back and examine these concepts, starting with terminology.
Terminology
Version control, also called “source control”, is used to track and store changes in your files without losing the history of your past changes. Picture yourself writing a paper in Microsoft Word: you continuously make edits to your document and save them, typically to the same file. But what if you wanted to undo the edits you did two saves ago? You can’t. Version control allows you to do so by saving every set of changes you made to the document (or sets of documents.) It can be a game changer when it comes to coding.
Version control has a particular workflow and many moving parts, both of which combine to make for a somewhat steep initial learning curve. However, through practice and some trial and error, you should have sufficient command over the technology to make it work for you. We’ll begin with some basic vocabulary that will make more sense when put into context when we run through some examples.
♦ Basic vocabulary of version control
There are more terms than these in the world of version control, but these are enough to get you started without overly confusing issues.
- Repository: a location where all the files for a particular project are stored, usually abbreviated to “repo.” You will likely maintain both at least one local repository (on the machine(s) where you are writing your code) and a remote repository (that lives in the cloud and is periodically synchronized with your local repository).
- Clone: Cloning is the process of creating a new local repository from a remote one.
- Staging: Staging a file adds it to the set of files that you are going to log as a single commit in your local repository. You can stage one more many files in each commit.
- Commit & Commit message: A commit is a record of changes or additions to files that have been marked as “staged”. The record of the commit is stored in the local Git database and is referenced by an internal identifier (called a “SHA”) as well as a commit message that you provide. Git provides a full history of all the commits you have made, and you can undo a commit (which actually creates a new commit that reverses the previous commit). You can also reset your entire repository to a specific commit, deleting all changes since that commit.
- Pushing/Pulling: These refer to actions used to synchronize the remote and the local repositories. Changes in the local repo are pushed to the remote, and changes in a remote repo are pulled to the local repository. (The remote repository is often named “upstream” to cement this notion.)
♦ What are Git and GitHub?
Git and GitHub are technologies that facilitate versioning. They actually do a lot more than that, but let’s focus on the versioning bit, beginning with the difference between Git and GitHub:
Git is software installed on your local machine that enables version control. The application itself can be used via a command line shell (“Git Bash”), but many applications such as VS Code include graphic interfaces that can issue Git commands. However, it’s the Git software that provides the actual engine for managing the Git versioning databases within your local repositories. Git has been installed on all NSOE machines, but if you need to install it on another machine, you can download it at: https://git-scm.com/
GitHub is a cloud resource where the remote repositories are kept. Individuals have their own account on GitHub and within this account you maintain your repositories. These repos can be public (anyone can see and pull from it) or private (only you can see and pull from it). You can maintain exclusive control over items pushed to this repository, or you can add collaborators who can also push to it.
GitHub is not only a valuable resource for maintaining your own versioned repositories, it also allows coders everywhere to share their work so that others can build off of it. Check out ESRI’s GitHub page, https://github.com/Esri, and explore the wealth of materials accessible there.