Adv. Geoprocessing 1 - Preparing for Analysis
Introduction
You’ve just settled in to your new job at DataDevils Inc. and find a post-it note on your cube. Your supervisor, who has just left for a week long conference, has asked you help her “to summarize the demographics found along a selected hurricane path”. So, you fire up your computer (which fortunately is set up just like the machines you used at the Nicholas School) and begin your work.
What comes next is the focus of this session. Specifically, we’ll address the following initial steps to completing the overall task, steps I group and call “preparing for analysis”. Then, in subsequent sessions, we’ll explore how to leverage the more advanced capabilities of the ArcGIS Pro model builder to build our initial workflow into a powerful geoprocessing tool.
The sequence and learning objectives are described below:
| Section | Learning Objectives |
|---|---|
| A. Refine vague objectives to an actionable one | • Identify research objectives that can be answered with GIS • Clarify objectives that can’t be answered with GIS • Restate research questions in terms that spatial analysis can solve |
| B. Create a proper geoprocessing workspace | • Create a logical and portable GIS project folder structure • Describe the usefulness of a scratch folder • Explain the pros and cons of using a geodatabase vs a folder • Set environment variables that facilitate project portability |
| C. Add data & create a geoprocessing workflow | • Search and add feature layer service data to your project • Download, unpack, & add hurricane track points to your project • Construct the initial workflow to execute your task • Execute, check, and debug your workflow |
| D. Versioning your work | • Create an archive of your project’s progress • Explain what versioning means |
A. Refine a vague objective into an actionable objective
Computers are good at running analyses that we design, but they require precise instructions. Thus, the first step in executing any geospatial task is to translate human instructions (vague) to computer instructions (exact). Sometimes this is straightforward; often it’s not. Our supervisor’s note asking us “to summarize the demographics found along a specific hurricane path” is perhaps a particularly hard challenge. What does she mean by “summarize”? “demographics”? “along a specific hurricane track”?
Ideally, you’d have a follow-up conversation with your supervisor to further define these terms, but she’s away for the week. This is a worst-case scenario, but there are things you can do:
- Ask your new co-workers for any intel that might help you clarify what she meant by the vague terms. Or at least clarify what the context of the analysis is, or how it will be used and by whom. You might also think in terms of the objective of your new company or group within the company?
- Beyond that, you’ll simply have to interpret the best you can. HOWEVER, one of the benefits of developing your analysis in the geoprocessing modeler is that it’s fairly easy to modify later on. So, if you can produce a robust and organized initial workflow, you can fix any misinterpretations after the fact.
- FURTHERMORE, we can build flexibility into our model. Rather than a fixed interpretation of what “demographics” means, we can allow that to be a variable that is selected when our model is run.
So that we are all on the same page, we are going to go with the following interpretation of the initial instructions:
- “Demographics” will refer to a specific variable contained in the 2010 census data. We’ll just chose “households” as an initial variable, using census counties as the spatial unit.
- “Summarize” will be interpreted as “total” or “sum”, i.e. the total number of households, but perhaps we can build our model so that “mean”, “median”, “variance”, etc. can easily be swapped in for sum.
- “Along a specific hurricane track” will be counties intersecting a given storm track. We could instead select counties within a set distance, but it’s perhaps best to start simple and add complexity if/when needed. If we design our tool well, this can be easily changed later. And as for a “specific” hurricane track, we’ll start with one we select, but later on to allow our supervisor to replace it with her own…
So, now we have an actionable objective: Build a geoprocessing model that selects all census blocks within 1 km of a point feature and compute the sum of households of the selected block-groups. Yes, this is full of assumptions, but the notion is that, if we can build this, we should be able to modify it later to adapt to whatever changes we might be asked to make.
For discussion:
Think of some other tasks you were asked to do, perhaps the geospatial component of your masters project or some other project you are working on. Were those tasks originally actionable? Or did you have to make some assumptions before unleashing the power of GIS on them? What were those assumptions and how did you formulate them?
B. Create a proper ArcGIS workspace
Now that we have an actionable workflow in mind, the next task is to build it. But before we can do that, we need to set up our analysis workspace.
By now, you’ve built a number of geoprocessing models for other classes and perhaps for other projects. If you were to go back to those old projects, would you be able to make sense of what you did? Could someone else make sense of it? Are there a number of intermediate datasets that you could probably delete, but you’re not quite sure which ones?
As you take on more and more GIS projects, you’ll likely need to juggle priorities and go back and forth between multiple active projects. You’ll also likely want to revisit old project and recycle old workflows for new projects. All this means that your project workspaces should be well organized, kept tidy, documented, and have some logic to them.
Here I present a workspace model that’s worked for me, that I use each time I begin a new geospatial analysis project. Mimic this workspace exactly as shown here for now, but later on don’t hesitate to adapt it to what works best for you.
✅B1. Create a new ArcGIS Pro Project
ArcGIS Pro is project oriented, meaning when you start it you are asked to create a new project in a specified folder. The default is to create a new folder for the project, and ArcGIS Pro will add a few files into this folder. In creating a new ArcGIS Pro project, however, I’ve learned one very important notion:
![]() Do NOT include spaces in project name or folder, and ensure that no spaces occur anywhere in the path of this folder!
Do NOT include spaces in project name or folder, and ensure that no spaces occur anywhere in the path of this folder! ![]()
I simply can’t emphasize this enough. It’s the first thing I look for if a student is finding odd errors when running a tool. It’s also good practice to avoid names that start with a number and non alpha-numeric characters other than the underscore (“_”) in your file and folder names.
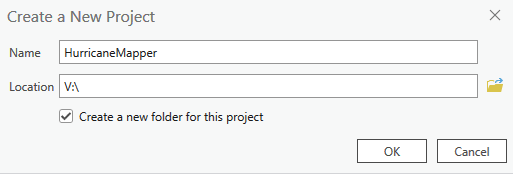
► TASK B1: Create a new ArcGIS Pro project named “
HurricaneMapper", opting to create a new folder to contain this project. As shown below, for our exercise, we’ll place the project in our mapped CIFS (i.e. theV:) drive.
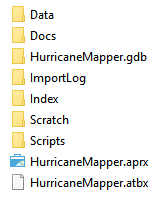
When you complete this, ArcGIS Pro will be open and it will have created a number of new files and folders in your project folder:
- HurricaneMapper.aprx: This is your ArcGIS Pro project file.
- HurricaneMapper.atbx: This is your ArcGIS Pro toolbox file.
- HurricaneMapper.gdb: This is your ArcGIS Pro project geodatabase.
- Index: This folder contains indices used to speed processing in some analyses.
- ImportLog: This folder contains any autogenerated import logs.
✅B2. Create Project sub-folders
Create the following sub-folders in your project folder: “Data”, “Docs”, “Scratch”, “Scripts”. Keeping your workspace organized is key to keeping your analysis manageable and understandable. These sub-folders allow us to separate files used for different purposes:
-
Data folder: This folder will house the data used to drive your analysis; if your analyses requires data to run, it should be kept here.
Note: ArcGIS Pro also creates a project geodatabase by default when you create a new ArcGIS Pro project. I find instances where it makes sense to store data there instead/also. However, not all data sources can be stored in a geodatabase (e.g. raw CSV files). Again, find what works best for you.
You may wish to create additional sub-folders based on the source of your data. Or, you may wish to create “raw” and “processed” sub-folders. Experiment with different sub-folder organization schemes to find what works best for you, but try to make it easily understandable to you, your future self, and others.
All the data stored here should be well documented. Include metadata files and any other information relevant to where the data came from and how it should be use.
-
Docs folder: This folder will house files not used in the analysis, but related to the project. These can be a longer description of the project and how it should be used, background reports, other documentation, etc.
-
Scratch folder: GIS workflows often create a number of intermediate files that have to get stored somewhere. Storing theses intermediate files here allows you to contain them in a place that can easily be cleared out without fear of losing essential input or important derived data.
-
Scripts folder: Later on, we will be creating scripts to run our analyses. Often these scripts need to point to other files, e.g. data sources in our data folder. Putting these scripts in their own sub-folder will allow us, using relative pathnames, to find these other files, but also keep our script files organized.
You may wish to add more sub-folders in your project folder as needed. For example, your tool may interact with other, 3rd party software that you can put into a subfolder called “Software”. I find these four base sub-folders, however, as my go-to workspace structure and I recommend you start with this same structure, experiment for a while, and after a time, settle into a consistent structure that works for you.
►TASK B2: Create the 4 sub folders in your
HurricaneMapProjectproject folder.
✅B3. Create a Scratch geodatabase
These files can remain as is and are all useful components in your workspace. However, we’ll want to create one more object: a scratch geodatabase in your Scratch folder. Do this within ArcGIS Pro and then once created, right click on the Scratch geodatabase and select “Add To Project” so that it will be seen in the Project/Databases section.
►TASK B3: Create a new geodatabase named
Scratch.gdbin yourScratchfolder.
✅B4. ArcGIS Pro Environment Settings
Our GIS analyses will go much more smoothly if we take a moment and set default values for certain environment settings. While some projects will benefit from other values being set, the ones we always want to set are the two Workspace environments. Setting these saves time in finding data and directing intermediate files to be stored in our scratch folder instead of mingling with our “keeper” datasets.
- Set the Current Workspace either to your Data sub-folder or to your project’s geodatabase. Which one really depends on your preference and specific needs. I used to always use the Data folder, but as geodatabases are getting more stable, I’m liking them more.
- Set the Scratch Workspace either to your Scratch sub-folder or your Scratch.gdb geodatabase. Again, which one you chose is up to your preferences and needs. I’m leaning more toward the geodatabase myself.
► TASK B4: Set your Current and Scratch workspace environment variables. Then save your project.
✅B5. README.txt File
Lastly, we want to add a simple text file that includes a brief description of the project for which this workspace was created. The purpose of this file is to easily identify this workspace among others to “your future self” or to others. Be sure to always include your name and email (or just email, if it’s descriptive enough) and the date.
► TASK B5: Create a
README.txtfile in your project folder and add a project description, your name/email, and the date.
In the end your project workspace will have the necessary framework for a robust and organized analysis. By default, ArcGIS Pro uses relative pathways so that links to all files within the project are relative to the project’s folder location. This is important because it allows you to move the entire project folder without the Project losing track of all the data it needs.
When complete, your workspace look like this in Windows Explorer:
♦ For discussion:
Are there other was you might construct this project workspace?
When might you want to use a geodatabase or not use a geodatabase?
» A compressed copy of this workspace completed to this step is available here: HurricaneMapper_InitialWorkspace.zip
C. Add Data & Construct the Initial Workflow
With our workspace set up, the next steps include finding and adding the data needed to run the analysis and then constructing the workflow. By now, you’ve had some experience with both of these, so we’ll just dive into them.
✅C1. Find and add data required for your workflows
Demographic Data: USA Counties
Based on our assumption that “demographics” implies census data, we’ll get some census data. For starters, we’ll focus on counties knowing we could probably swap with other census datasets if the need arises. To get the counties, use the Portal in ArcGIS Pro to search for “owner:esri_dm counties”. Filter results for Feature Layers as the Item Type, and add the USA Counties (Generalized) to your map. This makes a connection to an on-line feature service that we can use in our models.
Hurricane track data
We’ll also need a data on hurricane storm tracts. For that, we’ll pull data from the NOAA’s International Best Track Archive for Climate Stewardship (IBTrACS) web site. Specifically, we’ll use the storm track points for the North Atlantic basin found here.
► TASK C1:
- Add the
USA Counties - Generalizedfeature layer service to your map.- Also, extract the contents of the
IBTrACS.NA.list.v04r01.points.zipfile to your Data folder- Add the feature classes to your map. Rename and symbolize each layer something useful and understandable.
✅C2. Construct the initial workflow
Constructing geoprocessing workflows was covered in your previous GIS courses, so we won’t dwell on it here. The important bit, however, is that you construct your workflow as an ArcGIS Pro model so that we can tweak it and later on get into advanced modeling techniques.
As always, there are many ways to execute our analysis. However, to keep consistent, construct your model as follows:
- Create a new model. Name it
HurricaneTrackerand label itHurricane Tracker. - Add the hurricane track points and US county layers to your model.
- Add the Select tool, and set it select track points where
SEASON = 2018 And NAME = 'FLORENCE'.- Set the output to be “SelectedTrackPoints” in your Scratch geodatabase.
- Add the Points To Line tool, and set it to produce lines for the selected points, sorted by
ISO_TIME.- Set the output to be “StormTrackline” in your Scratch geodatabase.
- Add the Select Layer By Location tool to select counties that intersect the storm track produced above.
- Add the Copy Features tool to write the selected features to a new feature class.
- Set the output to be “AffectedCounties” in the Scratch geodatabase (for now).
The model should appear as below (after tidying some element names):
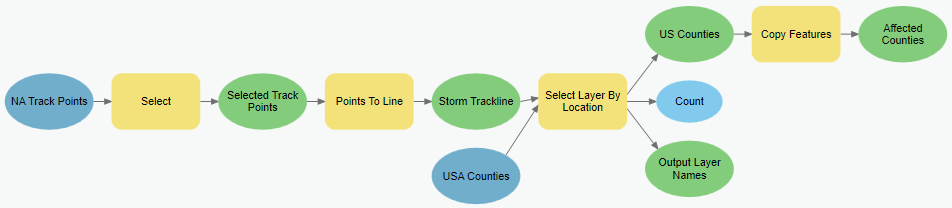
► TASK C2: Complete the steps above to construct your model. Test it. It should return 62 counties affected by Hurricane Florence.
♦ For discussion:
What happens to your model if you remove or just rename the layers in your map? Does it still run? How might you fix this? How easy is your model to change to run for a different storm season and name?
D. Save and “version” your work
This concludes the end of this session. Next we’ll be modifying our model to make it more efficient and interactive, but in modifying it, we may break it, so it’s good to retain a working base copy or version. To do this we can simply zip up the entire workspace once you’ve saved and exited your ArcGIS Pro Session. But first, let’s clean out all data except the files we need to run our model.
► TASK D1: Delete all data in your Scratch geodatabase. Then close ArcGIS Pro (saving it and any models). Zip up your entire workspace to a file named “HurricaneMapper_Version1.zip”
» A workspace completed to this step is available here: HurricaneMapper_Version1.zip