Adv. Geoprocessing 2 - From Workflow to Tool
Introduction
In the preceding session, we prepared a geoprocessing workspace and developed a workflow that identifies which counties intersect a hurricane track constructed from a selection of hurricane track points. It works nicely, and as we adhered to a tidy workspace format and developed our workflow in the ArcGIS model builder, it wouldn’t be too difficult to modify our model to run the same analysis for a different storm. However, we can make that process (re-running our workflow with different settings) a lot easier with some simple tricks…
In this session, we’ll convert our existing workflow into a collection of user-friendly tools - tools that will allow ourselves or others to leverage our hard work towards new ends. And in doing so, we’ll not only learn more about what ArcGIS Pro’s model builder can do, but we’ll also start to look at geoprocessing workflows from a more logical framework, which serves as a nice lead into our next topic on coding in Python.
| Section | Learning Objectives |
|---|---|
| A. Organizing & Streamlining the Model | • Tidy a model by renaming its elements • Set tool references to files, not layers in the map |
| B. From workflow to tool | • Create a model parameter from an element in your model • Expose a tool input as a model element & set as a parameter • Change properties & order of model parameters • Set the symbology of a model’s output • Create and use in-line model variables in your models • Add parameter filters to your model |
A. Organizing and streamlining your geoprocessing model
We are going to be adding some complexity to our model. The following will make this process much easier by allowing us to remain organized and on top of all the odd intermediate steps as we disassemble and reassemble our initial working model.
♦A1. Tidy your model
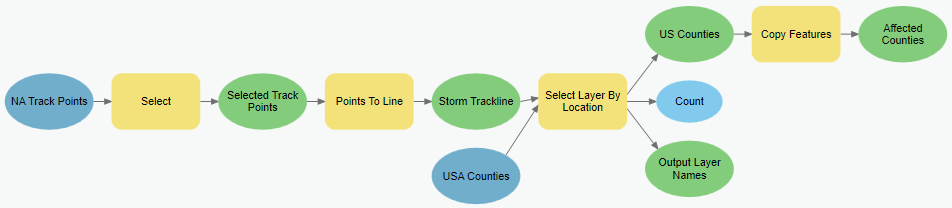
The last objective of the previous session was to develop a working model that got the job done, that is, extracted storm points for hurricane Florence in 2018, convert those points to a line, and use that line to select the counties along the storm’s path. We are now going to tweak this model and before we do, it’s a great time to tidy it up, if you haven’t already. By tidying, I mean:
- Rename all the elements in your model something logical and meaningful. For instance, you may have kept the default filename for the storm track points (“IBTrACS.NA.list.v04r00.points.shp”); we’ll want to rename that something better like “NA Track Points”. This goes for the names of the outputs of geoprocessing tools in your model.
- Rename all the outputs in your model something logical and meaningful. As above, if you haven’t already, you should review the filenames your outputs take on, even if they are temporary and dumped into the scratch workspace. Give these files names that are easily recognized in case you have to fetch these outputs to debug.
It’s fairly subjective what you chose to rename and what you rename it. The objective, however, should be able to make your model as transparent and easily understood by others – or by you in a few months time. This will make making changes to your model a lot easier as it gets more complex. The revised model I created is shown below.
♦A2. Set references of input data to files, not layers in a map
It’s likely that in constructing your original geoprocessing workflow, you used the layer in your map as the input to the Select tool. Often that works perfectly fine, but if that layer gets renamed, your model will break. To make your model more robust, it’s best to point tool inputs to the actual file location, that is, it’s path on your machine instead of layers on your map.
-
Open the input to the Select tool in your Hurricane Tracker model. The dropdown menu will show layers loaded in your project, but to get to the actual file, click the folder icon 📁.
-
Locate the
IBTrACS.NA.list.v04r00.points.shp(in your Data folder) and use that.When you do this, your model “breaks”. Why?

Turns out that the name of the file is too complex for ArcGIS Pro (too many periods), so we’ll need to rename the file to something more simple like “IBTrACS_NA.shp”. I find the easiest way to rename shapefiles (since they are actually comprised of many files) is to rename the dataset in the ArcGIS Pro Catalog pane by right-clicking on the dataset. However, if this fails, another route is to use the Copy Features tool to copy the dataset, giving the output a new name and deleting the original.
-
Rename the
IBTrACS.NA.list.v04r00.points.shpfile to something likeNATrackPoints.shpand use that in your model.
What about remote layers?
Ok, with a hiccup that we fixed, that worked well. What about the USA Counties layer that resides online? There’s no file to connect to the model element? Well, the answer is that search for the on-line layer from within the tool.
- Open up the Select Layer By Location tool in your model.
- Click the
 icon next to the existing USA Counties input features item.
 - On the left hand side of the “Input Features” window, select “ArcGIS Online”
- In the Search line (in the upper right) enter our search term:
us counties owner:esri_dm type:feature. - Select the ‘USA Counties Generalized’ option, and from that the
USA_Counties_Generalizedlayer.
This will now point the input to an ArcGIS Rest Service (which we’ll discuss later). It will also rename your model element, which you can revert back to “USA Counties” to keep your model tidy.
![]() If you have issues completing the above, simply replace the contents of your existing USA Counties to this:
If you have issues completing the above, simply replace the contents of your existing USA Counties to this: https://services.arcgis.com/P3ePLMYs2RVChkJx/arcgis/rest/services/USA_Counties_Generalized/FeatureServer/0
Your model should now run regardless of what happens to the layers in your map - whether they are renamed or removed. That’s because the model looks for the files themselves. This will make your model slightly more robust and therefore user friendly.
![]() A workspace completed to this step is available here: HurricaneMapper_Version2A.zip
A workspace completed to this step is available here: HurricaneMapper_Version2A.zip
♦ For discussion:
Can you think of a case where you’d rather have your model point to layers in the map rather than files in your workspace?
-
► A note on versioning your tools:
As you work incrementally on your geoprocessing project, you may want to capture stages of your progress. We did this at the end of the last session when we zipped a version of our entire workspace. This can be a real time saver if we mess things up, but it’s also a bit cumbersome as we have to close our entire ArcGIS Pro session.
An alternative is to save various versions of our central geoprocessing model which we can do simply by copying and pasting that copy of our tool (after saving it!) in the same or another toolbox. Whether and how often you do this is a matter of personal preference (or risk tolerance), but it’s good to know it’s a viable option.
B. From workflow to tool: parameters, symbology and variables
It would be easy enough to tweak our model to do the same analysis for a different storm : just edit the query statement in the Select process. However, we’re now going to look into a way that’s much more user-friendly; instead of requiring ourselves or others to dig into a specific process, we are going to set some model values as parameters.
All this really means is that we are going to make some things in our model easily changed when running the model rather than the familiar editing of the model. To see what I mean, double click your Hurricane Map model to open it in “open” mode. You’ll get the “This tool has no parameters” message meaning that you can run the model, and it will run, but each time you run it, it’ll give the same result…
We are going to alter our model to explore different scenarios where the user can specify a specific storm and output name by setting model parameters.
♦B1. Setting up user parameters
Creating a model parameter
- Open up your Hurricane Tracker model (in edit mode). Right-click the last element (result of the Copy Features process) and select “Parameter”: a P should appear to the upper left of the model element indicating that it is now a model parameter. Let’s see what this means…
- Save your model and open it (in open, not edit mode). You’ll see that the user can now change the name of the output file prior to running the model. Feel free to give it a try. Notice also that the name given to the parameter is the name of the element in your model that you set as the parameter (i.e., “Affected Counties”).
Exposing a tool input as a model element & setting it as a parameter
- Next, we’ll create a parameter for the expression used to select the storm year and name, but first we need expose the tools input as a variable. Right-click the Select tool and select “Create Variable > From Parameter > Expression”. This adds the query expression as an explicit element in your model. Now, right-click the Expression variable and set it as a model parameter.
- Save the model. (And view it in the “open” mode again, if you’re curious.)
Changing properties & order of model parameters
- Open up your model’s properties and select the Parameters tab. You’ll see some options you can apply to your parameters. We’ll make two changes here:
- First, change the order so that the Expression parameter appears first. Do this by clicking and dragging the row.
- Second, change the Expression parameter type from Optional to Required. Save your model and have a look at it in open mode.
- Now let’s run the model from the open mode, changing the storm season to
1996and the name toFRAN. Also, set the output to “Fran1996Counties” in your scratch geodatabase. Check the results. (Did you get 33 counties?)
► Task: Alter the model so that the track line (i.e., the output of the Points to Line tool) is also set as a parameter (named “Storm Track Lines”) and is added to the display. Order the parameters so that this appears as the 2nd parameter.
♦B2. Setting Output Symbology
⚠️[Note: The recording for this section is presented in the last part of the next section (B3. In-line variables)]
As it is now, we have no control over the symbology assigned to our model outputs. But we can change that.
- In your ArcGIS Pro map, symbolize the “Affected Counties” output as you’d want your model to create.
- Save this as a layer (
.lyrx) file by right clicking on the layer, selecting Sharing > Save As Layer File, and save the layer file into your “scripts” folder. - Open up your model’s properties again, and select the Parameters tab. In the row associated with your Affected_Counties parameters, way on the right side is a Symbology column. Click on the folder icon and navigate to the
.lyrxfile you just created. - Clear any previous model outputs from your project and re-run your model. Now each time it runs, the output will have that symbology.
► Task: Set your Hurricane Trackline output to show as a dashed red line.
♦B3. In-line variables
We see above how we can expose a parameter from a process, the Expression parameter from the Select tool in our case, so that we can use it as separate variable in the model, and ultimately as a parameter to the model. As a result, we’ve allowed the user to, at runtime, specify an expression query to select a specific storm via its name and season. Wouldn’t it be nice, however, if we could simply have the user input the name and year instead of a rigidly formatted query statement? In-Line model variables allow us to do just that – and more.
-
With your Hurricane model open in edit mode, right click anywhere in the white space and select Create Variable…. In the drop down menu, select String as the variable’s data type and click OK. Right-click and rename this variable “Storm Name” in the model. Finally double-click to open the “Storm Name” variable and set its value to
FLORENCE. -
Create a second variable. This time, set its data type to Long, rename it to be “Storm Season”, and set its value to be
2018. -
Now open up the Expression variable, switch to view in SQL mode, and edit it to read:
SEASON = %STORM SEASON% And NAME = '%STORM NAME%'Be sure that%Storm Name%is enclosed in single quotes as shown below.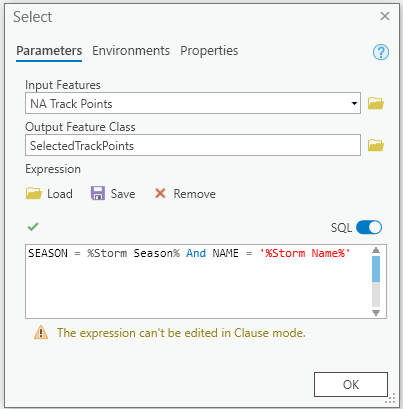
-
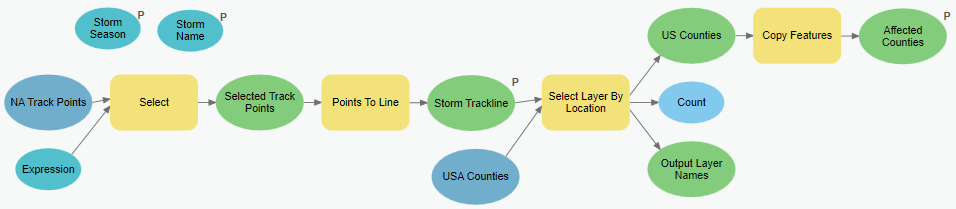
Set the Expression variable so that it is no longer a model parameter. And set both the Storm Season and Storm Name variable to be parameters. The result should look like this:
-
Save the model and run it from the “open” mode. Try it for a different storm (e.g.
CAMILLEin1969) -
What happens when you run the model for a non-existent storm, e.g.
DONALD in2020`?
Let’s review what we just did. First we created two new variables, one to hold a string and one to hold a long integer. The values of these two variables are used inside the Expression parameter of the Select tool; whenever a model process encounters some variable name surrounded by two % signs, it searches for an element in the model with that variable name and inserts the value of that variable into the parameter.
You should note that while spaces are important in these variables names, capitalization is not. So, we could have named our variable “storm name” and it would be fine, but “StormName” would cause the model to become unreliable.
♦B4. Parameter filters
There are a few additional steps we can take to make our model a bit more polished and user-friendly. These involve putting filters on the values a user can input so that the model runs smoothly. Here we will tweak the model so that the user can select from a list of storms that occurred in 2018. Also, we’ll change the output name so that it includes the storm name in its filename.
- Open up the properties of your models, and select the parameters tab.
- In the Storm Season line, scroll over to the Filter column. Change it’s value to Range. Lock in the year 2018 by setting the Minimum and Maximum values to 2018.
- Save your model, and run it in “open” mode. Try changing the Storm Season to a year other than 2018. Will it run?
- Go back your model’s parameters. Change the Filter for the Storm Name to Value List. In the value list window add the following entries:
ALBERTO,BERYL,CHRIS,ERNESTO,FLORENCE,MICHAEL. - Close the model properties window and then run the model, using
DENNISas the storm. *See how the model now restricts the user from entering an incorrect name?
![]() Don’t forget to save your model and your project often!
Don’t forget to save your model and your project often!
Recap
» A workspace completed to this step is available here: HurricaneMapper_Version2B.zip
We’ve now enabled users to access our workflow as a dynamic, user friendly tool! Those intimidating box and wire model diagrams are replaced by a familiar tool interface, but there are still more tricks to learn…