Adv. Geoprocessing 3 - Controlling Execution
Introduction
Virtually all the geoprocessing models you’ve created so far follow a linear path from start to finish. But what if we wanted our model to execute a set of processes only if needed or when a certain condition was met? For example, what if we wanted to add a field to a feature class, but only if that field did not already exist? Or project a raster unless the raster was already in the coordinate system? This, referred to as conditional execution, can also be done in geoprocessing models.
| Section | Learning Objectives |
|---|---|
| A. Using Preconditions | • Explain conditional execution in model workflows • Control execution of processes using preconditions • Control execution with geoprocessing “Logical” tools. |
| B. Branching and Merging | • Explain the concepts of branching and merging in workflows • Add a Boolean check box variable to your model • Branch model execution with this Boolean variable • Use the Merge tool to allow model completion after a branch |
| C. Looping & Iteration | • Explain the concept of iteration in workflows • List different types of iterators you can add to a model • Add a For iterator to your model to loop through several years of storms |
| D. The “memory” workspace | • Writing intermediate outputs to memory rather than to disk |
A. Using Preconditions 
In this first exercise we’ll construct a very simple conditional process. It involves creating a precondition, which is a variable linked to a process so that the process only runs if that precondition exists or is “True”. In our case, we’re going to add a check to our model so that it stops processing if no storm tracks are found that meet the user’s selection criteria.
-
Create a copy of your “Hurricane Tracker” model in your toolbox (e.g. using Cut and Paste). Call the copy “Hurricane Tracker-Preconditions”. We can revert to this if things go wrong, and delete it if we are comfortable with our updates…
-
Open up your model’s properties and remove any filters on your input parameters, if any have been applied.
-
From the Logical dropdown menu, select and add the If Row Count Is tool to the copied model, and use the Selected Track Points (Select process output) as the Row Inputs for this tool. Now, if no records are selected that meet the select expression, the Row Count will be zero – the equivalent of false in terms of a precondition.
Note that the Logical dropdown menu only appears when the ModelBuilder menu is active.
-
Connect the If Row Count Is tool’s False output to all downstream processes, selecting Precondition from the dropdown menu. This restricts these processes from running only if Row Count is considered “True” (i.e., if it’s value is not zero).
-
Save the model and run it (via “open” not “edit”), giving a bogus season (e.g.
2050). You’ll see in the model spawns a warning and stops does not execute the Points to Line tool or any tool after that because its precondition is false (Row count = 0).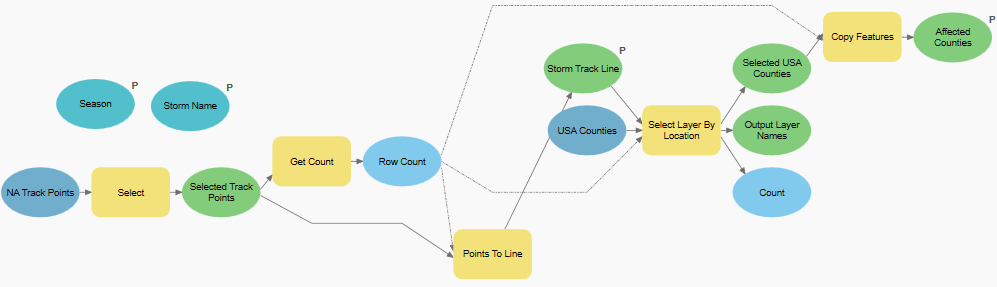
As seen in the above example, using a precondition is fairly straightforward and can be quite useful, particularly in preventing a long model process from running when the inputs are bogus.
Logical tools are not the only means for controlling flow; any tool that evaluates to a Boolean (true or false) value can be used as a precondition. Furthermore, numbers and strings can be evaluated as Boolean values. For example, the number zero is always treated as “false” with any other number treated as “true”. And an empty string (“”) is also treated as “false”, while a sting containing at least one character is “true”.
► TASK:
Note that the “Select Layer by Location” provides a “Count” output. If no features are selected, the Count will be zero, or “false”. Set this “Count” element to be a precondition for the “Copy Features” process. Now, the Copy Features process will only run if the storm track hits landfall.Try running with the storm BERYL in 2018 (which never makes landfall) and see for yourself!
B. Branching and merging
Next, we’re going to look at a more sophisticated example. Here, we are going to give the user the option of writing out the counties impacted by the storm track or just the storm track line. We’ll do this by adding a Boolean variable (shown as a checkbox) in the tool’s interface: if the box is checked, the model will produce the counties affected by the storm track, but if it’s not checked it will only produce the storm’s trackline.
This is done using the “Merge Branch” tool, found in the Logical dropdown menu. This tool accepts multiple inputs and will run through each input, in sequence, evaluate if it’s a viable object (e.g. if it’s a feature layer, does that feature layer exist?). If it is viable, the tool will return that object and stop evaluating the remaining objects. And if it’s not viable, it will continue to the next input.
Let’s see this in action.
- Make a copy of your previous model, calling this new copy “Hurricane Tracker - Branching”.
- Add a new variable to your model. Set its data type to Boolean, and rename it “Extract counties?”. Set its default value to True by opening it and checking the box. Set the variable to be a model parameter.
- Set the Select Layer By Location process so that it will only run if the Extract counties? Boolean variable is True (via precondition).
- Ensure that the output of the Points To Line tool (“Storm Track Line”) is set to “Add To Display”, but that it’s not set as a model parameter.
- Also ensure that the output of the Copy Features tool (“Affected Counties”) is set to “Add To Display” but is not set as a model parameter.
- From the Logical dropdown menu,add the Merge Branch tool to your model. Set its “in values” to be the results of both Copy Features (the “Affected Counties” element) and Points To Line (the “Storm Trackline”) tools – in that order. (Read the help associated with the Merge Branch tool and be sure you understand why).
- Rename the output of the Merge Branch tool element to “Model output”. Also, set it to be a model parameter and add it to the display.
- Save the model and remove and previous model outputs from your map. Run your model twice: once with the “Extract Counties?” unchecked as true and once with it checked. How does your model respond to the value of the Boolean checkbox?
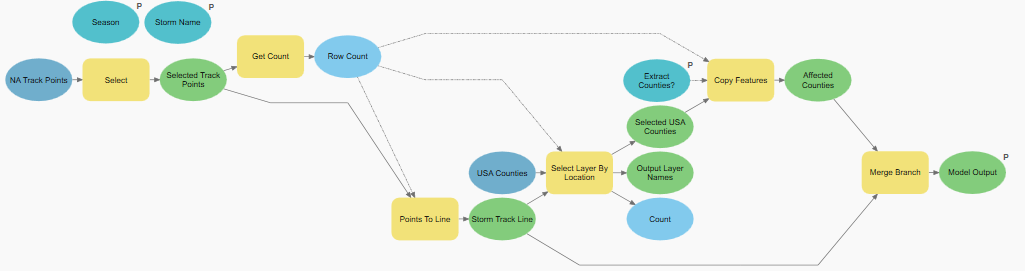
The above exercise demonstrates the two key components of controlling flow: an evaluation statement that branches the flow along two or more paths and a merging tool that resumes a single linear flow in the model. The evaluation statement can be quite involved, as shown in the ArcGIS help. However, while conditional processing can be done in a geoprocessing model, anything beyond a simple precondition can get complicated pretty quickly. I will argue later in this course that, if Python is required to do anything but the simplest conditional branching, perhaps its best to construct the entire model as a Python script. But that’s a few sections away…
https://pro.arcgis.com/en/pro-app/tool-reference/modelbuilder-toolbox/merge-branch.htm
C. Looping and iteration in a geoprocessing model
Geoprocessing models are great for repeating the same analysis over and over with different inputs. We’ve just seen how easy it is to add a few parameters our original hurricane model so that we can run it for any hurricane for which we know its name and season. Still, if we wanted to run this for 10 hurricanes, we’re going to have to babysit the process and enter a new hurricane name after each run.
Fortunately, some techniques are available to iterate models through multiple values. In the following exercise we will explore how to run our model once, but in doing so complete the analysis for several storms with outputs generated for each. In this case, we will use one of several “model-only” tools, i.e., tools that are designed to control the processing within a model, and thus are only available within a model and not from any toolbox.
♦Iteration with a For iterator
In the example below, we modify our model so that it creates a storm track feature class for the first storm of the year over a set span of years. For simplicity’s sake, we’ll drop the processes that extract the counties and just create the storm tracks.
- Make a copy of the previous “Hurricane Tracker - Branching” model, renaming the copy “Hurricane Tracker - Iteration”
- Simplify the newly copied model to just produce the track lines, not the intersecting counties:
- Delete every process except for the Select, If Row Count Is, and Points To Line ones.
- Also, delete the Expression, Storm Season, and Storm Name variables if they exist in your model.
- Revise our input storm track point dataset. Currently, we only have the track points occurring in the North American basin; here, we want to include tracks from all basins. We could download this feature class from the same location we grabbed the NA track points, but instead, we’ll link to an on-line web service that I’ve hosted on ArcGIS Online:
- Open the NA Track Points element in your model and change its value to the URL associated with the feature service:
https://services1.arcgis.com/XBhYkoXKJCRHbe7M/arcgis/rest/services/IBTrACS_since1980_list_v04r00_points/FeatureServer/0 - Rename the element to “All Track Points”.
- Open the NA Track Points element in your model and change its value to the URL associated with the feature service:
- Next, we are going to add an iterator variable. In our example, we will use a For iterator.
- From the Insert ribbon menu, select Iterators>For to add the iterator to your model.
- Open up the For iterator and set the From value to
2010, the To value to2018, and set the By value at2. - Rename the “Value” output of the iterator to Storm Season.
- Optionally, set the Storm Season variable to be a precondition to the Select process. (The model will work without this, but it does make for a tidier model diagram.)
- Now we need to modify the expression in the Select tool so that it selects the first storm for the year specified in the For loop.
- Edit the expression in the exising Select tool to read:
SEASON = %Storm Season% AND NUMBER = 1.
- Edit the expression in the exising Select tool to read:
- If we ran our model now, it would repeat the analysis for the values we set in our iterator (2010, 2012, 2014, 2016, and 2018). However, for each run, the output produced would overwrite the previous iteration’s output as they all have the same name (“Storm_Trackline”). So, we need to alter our model so that it uses a unique name on every iteration. Fortunately, we can do this simply by including our inline
%Storm Season%variable the name of the file generated by the Points To Line process.- Open the Points To Line tool in your model and set its Output Feature Class to be
trackline_%Storm Season%(in the Scratch or the HurricaneMapper geodatabase.
- Open the Points To Line tool in your model and set its Output Feature Class to be
- Finally, to allow the output to appear on our map, we need the Collect Values tool, available in the Utilities dropdown in the Insert ribbon menu. Add this tool to your model and connect the output of the Points To Line process (i.e. “Storm Trackline”) to it. Also, ensure that “Storm Tracklines” is not set to add to display and that it is not a model parameter. Instead, set the output of the Collect Values too is set to add to display and is a model parameter.

- Save the model, validate it (this resets the iterator) and run it (either from Edit or Open mode). Note that the outputs do not get added to the display, but check your geodatabase and you should have the 7 county feature classes – one for each storm added to your storm names list.
►TASK: See if you can modify this model so that the start and end seasons are set as user parameters.
In the above exercise, the For iterator caused the model to run for a span of years. We also used in-line variables to control the output name so that we didn’t simply write the model output to the same filename each time (resulting in only one output).
Consult the desktop help to see how other iterators work. Instead of a for loop, we could have used other objects, such as rasters in a workspace, values in a field, rows in a table, etc., and loop through unique values in them and execute a process. Iterators can be a bit tricky to set up, but you can see that they can be quite useful in letting the computer process a number of repetitive tasks without our help.
D. Using the “Memory” workspace
Our existing models write intermediate outputs to our Scratch geodatabase. For most, but not all tools, however, we can write intermediate outputs to our computer’s memory (i.e. its RAM). It’s usually faster to write to RAM than disk, potentially speeding up our processing. The downside, though, is that your machine’s RAM is used by numerous other operations, and overloading the RAM could actually slow your process. But if you have a machine with ample RAM, and you are working with relatively small files, then you may wish to capitalize on using the “memory” workspace.
To do this, simply set your output from being written to your Scratch.gdb, swapping the path with “Memory”. Do note, however, that not all tools can accept in-memory datasets, so your mileage may vary, as they say.
►TASK: Set the outputs of your
Selectto to be written to memory instead of the Scratch geodatabase.
Recap
» A workspace completed to this step is available here: HurricaneMapper_Version3.zip
We’ve added some powerful tools to our geoprocessing models - the ability to go beyond simple linear workflows and to repeat workflows a number of times. These can be real time savers in certain cases. However, we are also starting to hit the limits of working in the Geoprocessing Modeler as implementing these techniques remains a touch clunky.